Grade Level
K, 1, 2, 3, 4, 5, 6, 7, 8, 9, 10, 11, and 12
Difficulty
Easy
Duration
30 minutes
Subjects
Biology
Science
STEAM
-
– Asking Questions and Defining Problems
– Developing and Using Models
– Planning and Carrying Out Investigations
– Analyzing and Interpreting Data
– Using Mathematics and Computational Thinking
– Constructing Explanations and Designing Solutions
– Engaging in Argument from Evidence
– Obtaining, Evaluating, and Communicating Information -
Students communicate clearly and express themselves creatively for a variety of purposes using the platforms, tools, styles, formats and digital media appropriate to their goals.
Vocab
Plant
Herb
Flower
Seed
Soil
Author
Glowforge
Licensing

Lesson for Download
Overview
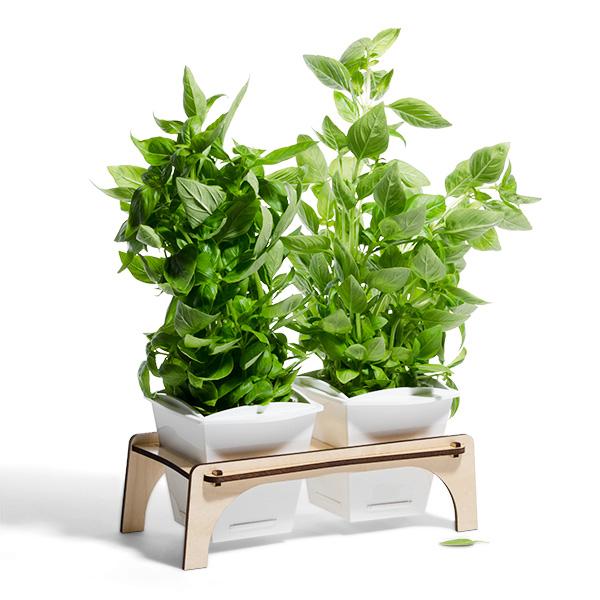
Brighten up your school with printed Windowsill Planters! In this activity, students will print, and assemble mini gardens that they can distribute throughout their school. Students can fill the planters with herbs, flowers, or vegetable seeds to learn how different plants grow, while also brightening their classrooms by sharing plants with the entire school.
Objective
Thematic Questions:
Standards:
ISTE Standards for Students
NGSS Science & Engineering Practices
Supplies
- 1x Plywood Thick
- 1x Acrylic Medium
- Potting soil
- Herb and flower seeds
- Materials for labeling or customizing the planters (e.g., markers, stickers, pens, or paint)
- Optional: Consider including a simple note or directions on how to best care for the plants.
Catalog Designs

Description
Lesson Outline:
Get Ready:
Have students read through the activity details to familiarize themselves with the steps to complete the activity. Students should gather all of the materials needed to print, assemble, and customize each classroom garden planter.
Production Time:
Print – 16 minutes Assemble – 5-15 minutes
Lesson Instructions
Section 1 – Create:
Have students…
- Plan for printing garden planters by gathering all of the materials and reviewing the designs in the Glowforge app.
- Create each garden planter by following the steps of the Windowsill Planter design project to print and assemble its parts.
- Test their planters. How well will they hold soil and water? Is there anything that needs to change to make them work better?
Section 2 – Use:
In small groups…
- Decide which types of herbs and flowers they want to offer in custom planters for other classrooms, remembering that each stand can hold two planters and multiple plants.
- Generate survey questions for teachers in your building to learn what type of planter they would like. You can use a paper survey or use a digital survey tool like Google Forms or Microsoft Forms. Some possible questions to ask:
- Teacher Name
- Room Number
- Plant Choice #1
- Plant Choice #2
- Gather the seeds chosen for each classroom, then organize them and label the planters to make sure that they are assembled together for the right classes.
- Pass out 2-3 seed packs to each group and discuss the different plants. You might ask questions like, “What do you notice about the different directions depending on the seed packages?” or “Why do different plants have different planting directions?”
- Have students prepare their planters by adding soil and seeds using the seed package directions as a guide.
- Pass out the planters and stands throughout your school. Consider including directions on how to best care for the plants.

Reflection Questions:
Help students consider…
- How might plants in the classroom impact the mood of the school community?
- How can the school use herbs, vegetables, or flowers grown in the planters to enhance the community?
- What do our Classroom Garden plants demonstrate what we know about plants, their parts, and how they grow?
- Beyond using a classroom garden planter for plants, how else might we use this stand and container in the classroom or around the school? Brainstorm possible ways that the stand and container could be used to help with things like organization or displaying items.
Pro Tips:
- If creating prototypes prior to doing final prints, use cardboard for test prints. Consider doing a test print to use as an example for students’ reference.
- Just remember that if their design uses joinery such as slots or finger joints, these may need to be adjusted to suit their prototyping materials.
- When choosing test materials, make sure to use materials that are laser compatible. You can learn more about what materials are compatible with Glowforge here.
- Label planters prior to adding soil and seeds to track what goes where. Consider using the Glowforge app to engrave labels permanently onto the planters using either trace, or the text tool.
- Demonstrate how to plant each type of seed based on its packaged instructions.
Reimagine:
- Consider connecting this activity to a plant or photosynthesis lesson plan. Growing plants inside and making observations has many curricular connections in different classes and grade levels. Consider using variables like access to light or soil condition as part of an experiment to learn about plants, soil, or photosynthesis.
- Experiment with planter material. Could using clear acrylic allow you to see the root structure of the plants?
- Use this project as an opportunity to engage your students in crafting effective surveys or interviews. What essential information needs to be gathered to learn about the plants each classroom wants most? What are some different ways to ask the same question?
Meet Glowforge
The magical 3D laser printer that made this lesson possible. Learn more!


