Grade Level
3, 4, 5, 6, 7, 8, 9, 10, 11, and 12
Difficulty
Intermediate
Duration
1 hour
Subjects
Design & technology
Engineering
Mathematics
Science
STEAM
Technology
-
Students develop and employ strategies for understanding and solving problems in ways that leverage the power of technological methods to develop and test solutions.
-
Students use digital tools to broaden their perspectives and enrich their learning by collaborating with others and working effectively in teams locally and globally.
-
– Asking Questions and Defining Problems
– Developing and Using Models
– Planning and Carrying Out Investigations
– Analyzing and Interpreting Data
– Using Mathematics and Computational Thinking
– Constructing Explanations and Designing Solutions
– Engaging in Argument from Evidence
– Obtaining, Evaluating, and Communicating Information
Vocab
Gear
Driveshafts
Instructional Design
Author
Glowforge
Licensing

Lesson for Download
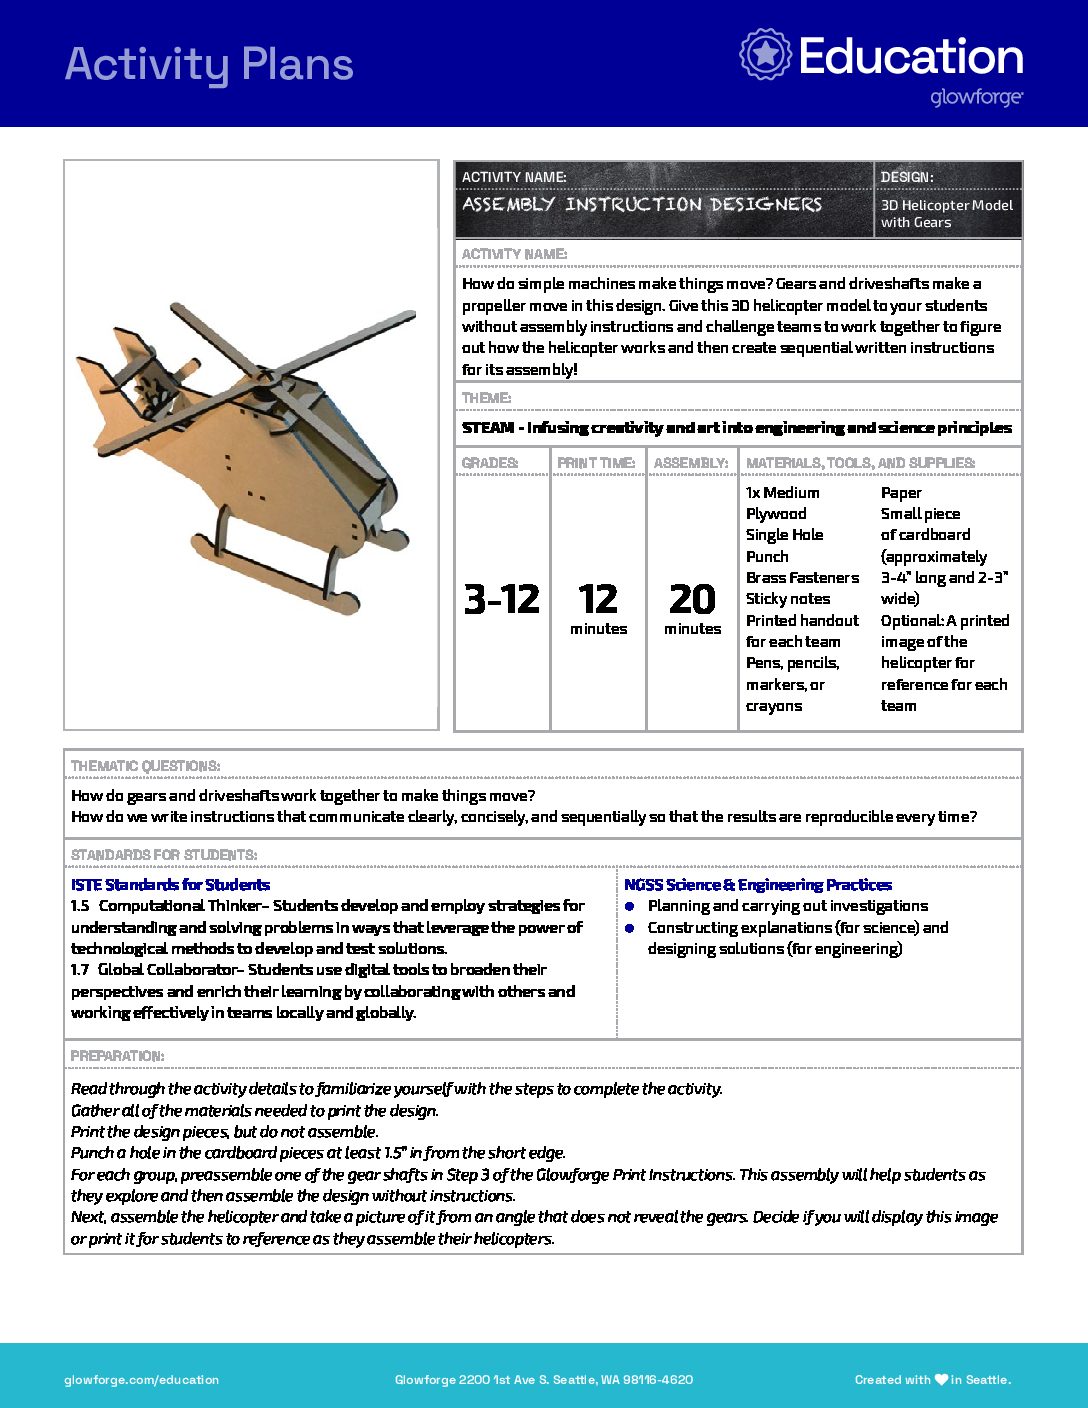
Overview
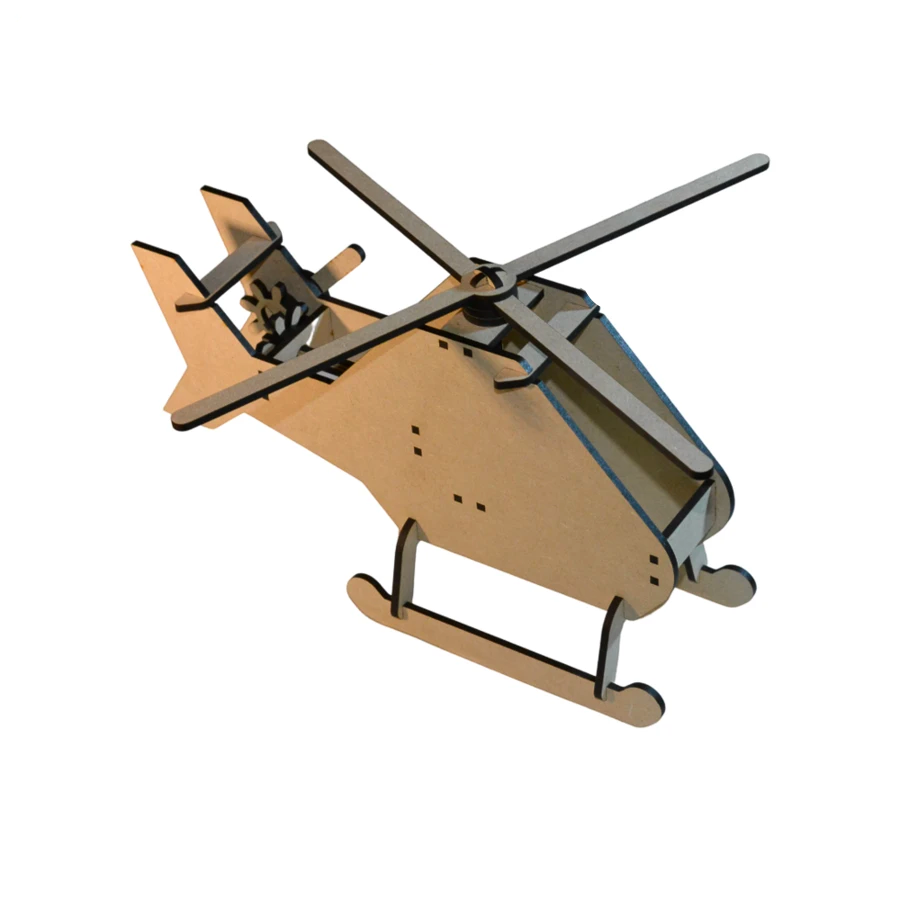
How do simple machines make things move? Gears and driveshafts make a propeller move in this design. Give this 3D helicopter model to your students without assembly instructions and challenge teams to work together to figure out how the helicopter works and then create sequential written instructions for its assembly!
Objective
Thematic Questions:
Standards:
ISTE Standards for Students
NGSS Science & Engineering Practices
Supplies
- 1x Medium Plywood
- Small piece of cardboard (approximately 3-4” long and 2-3” wide)
- Single Hole Punch
- Brass Fasteners
- Paper
- Pens, pencils, markers, or crayons
- Sticky notes
- Printed handout for each team
- Optional: A printed image of the helicopter for reference for each team
Catalog Designs
Description
Lesson Outline:
Get Ready:
- Read through the activity details to familiarize yourself with the steps to complete the activity.
- Gather all of the materials needed to print the design.
- Print the design pieces, but do not assemble.
- Punch a hole in the cardboard pieces at least 1.5” in from the short edge.
- For each group, preassemble one of the gear shafts in Step 3 of the Glowforge Print Instructions. This assembly will help students as they explore and then assemble the design without instructions.
- Next, assemble the helicopter and take a picture of it from an angle that does not reveal the gears. Decide if you will display this image or print it for students to reference as they assemble their helicopters.
Production Time:
Print – 12 minutes Assemble – 20 minutes (Time will vary as students will be assembling without detailed directions)
Lesson Instructions
Section 1 – Create:
- Ask: “What is a gear?” and “How do gears create movement?” Students’ responses might include that a gear is a simple machine made up of a wheel with teeth that intersect together with other gears to create movement.
- Ask: “Where have you seen gears in use?” Give students time to think and time to share with others. Examples might include clocks, bikes, can openers, cars, and LEGO sets.
- Encourage students to explore how gears work. Give each team two gears: a single gear and one that is part of the pre-assembled axle from the printed design. Also, give each group the small piece of cardboard with the hole punched in it and a brass fastener.
- Have teams affix one gear to the cardboard using the brass fastener. It should be loose enough to turn. Challenge them to explore the gears and try to make the affixed gear turn with the pre-assembled axle.
- Ask: “Do the gears still work if they are perpendicular to each other?” Students should be able to intersect the gears and turn them.
Section 2 – Use:
- Explain that each team will be assembling a helicopter, but the directions got lost! In this challenge, they will create a new set of easy-to-follow instructions to assemble the helicopter. Explain that the gears provided in the design turn the propeller blades on the top and at the tail of the helicopter.
- Display or pass out the image of the assembled helicopter. Teams will use this as a reference as they work to assemble theirs.
- Distribute the rest of the unassembled print and the pre-assembled gear shaft to each team.
- As students work to assemble their helicopters and write concise, step-by-step instructions, remind them that the instructions should be clear and in sequential order from start to finish. For an optional challenge, students can create simple illustrations to accompany their instructions.
- Students may find this activity challenging. Encourage teams to share hints and work collaboratively with other teams to problem solve.
- Once teams have recorded their instructions, have them get a sign-off from another team that the helicopter has been completely assembled with no extra pieces leftover and the blades spin when the rotor on the tail is turned.
- Have teams disassemble their helicopters, taking care not to lose any pieces.
- Pair up teams and have them exchange their instructions.
- Using only the other team’s instructions, students should attempt to put their helicopter together. They should not rely on their understanding of assembling it but follow the other team’s instructions methodically. If there is a missing or unclear step, they should provide the other team feedback, either with a sticky note on the instruction sheet or taking notes separately to then share with the team..
- After reviewing the other team’s instructions, students should regroup and make any adjustments to their own instructions based on the feedback they received.
- Have each team create a finalized, clean copy of their instructions. Consider using a digital tool to create an instruction booklet.

Reflection Questions:
Help students consider…
- What surprised or frustrated you about this process? How did your perception of the activity change as your team progressed through the process of writing and rewriting?
- Explain the strategies your team used to complete the challenge? What would you do differently if you did this activity again?
- How might the process of assembling the helicopter be made more challenging?
Pro Tips:
- Different age groups will have different amounts of familiarity with gears and how they work. Therefore, a pre-lesson on how gears work as simple machines and levers can reinforce the mechanical concepts of this activity.
- Use this activity to reinforce descriptive and sequential writing in language arts. In science, social studies, and other content areas, try using it as a follow-up or to support the practice of procedural or process writing.
- Pass out small bags when students dismantle their helicopters to keep the pieces organized and together.
Reimagine:
- How could the 3D Helicopter Model with Gears be used in physics class to introduce gear ratios and their effect on motion, speed, torque, and power? Have students adjust the size of the gears in this print to understand gearing up or down based on teeth and gear size.
- How could the 3D Helicopter with Gears completely assembled be used as a simple machines exploration tool for K-2? Give assembled prints to students to explore through play or explore more complex machines made from simple machines. For example, using gears and a lever makes a winch – add a string to the axle between the tail and the body of the helicopter and attach something of weight like a small toy to the string. Have students wind the tail and watch the toy move up and down.
- How could the 3D Helicopter Model with Gears be manipulated for a Design Challenge? Remove gears or axle pieces from the helicopter design. Then, have students design and print their own versions of the missing components and reconstruct the helicopter using their custom parts.
Meet Glowforge
The magical 3D laser printer that made this lesson possible. Learn more!
