
Grade Level
1, 2, 3, 4, and 5
Difficulty
Easy
Duration
1 hour 15 minutes
Subjects
Art
Craft
Design & technology
Digital Arts
Fun
Holiday
STEAM
Summer Camp
Vocab
Engrave
Cut
Score
Edge-Lighting
Author
Glowforge
Licensing
Lesson for Download
Overview
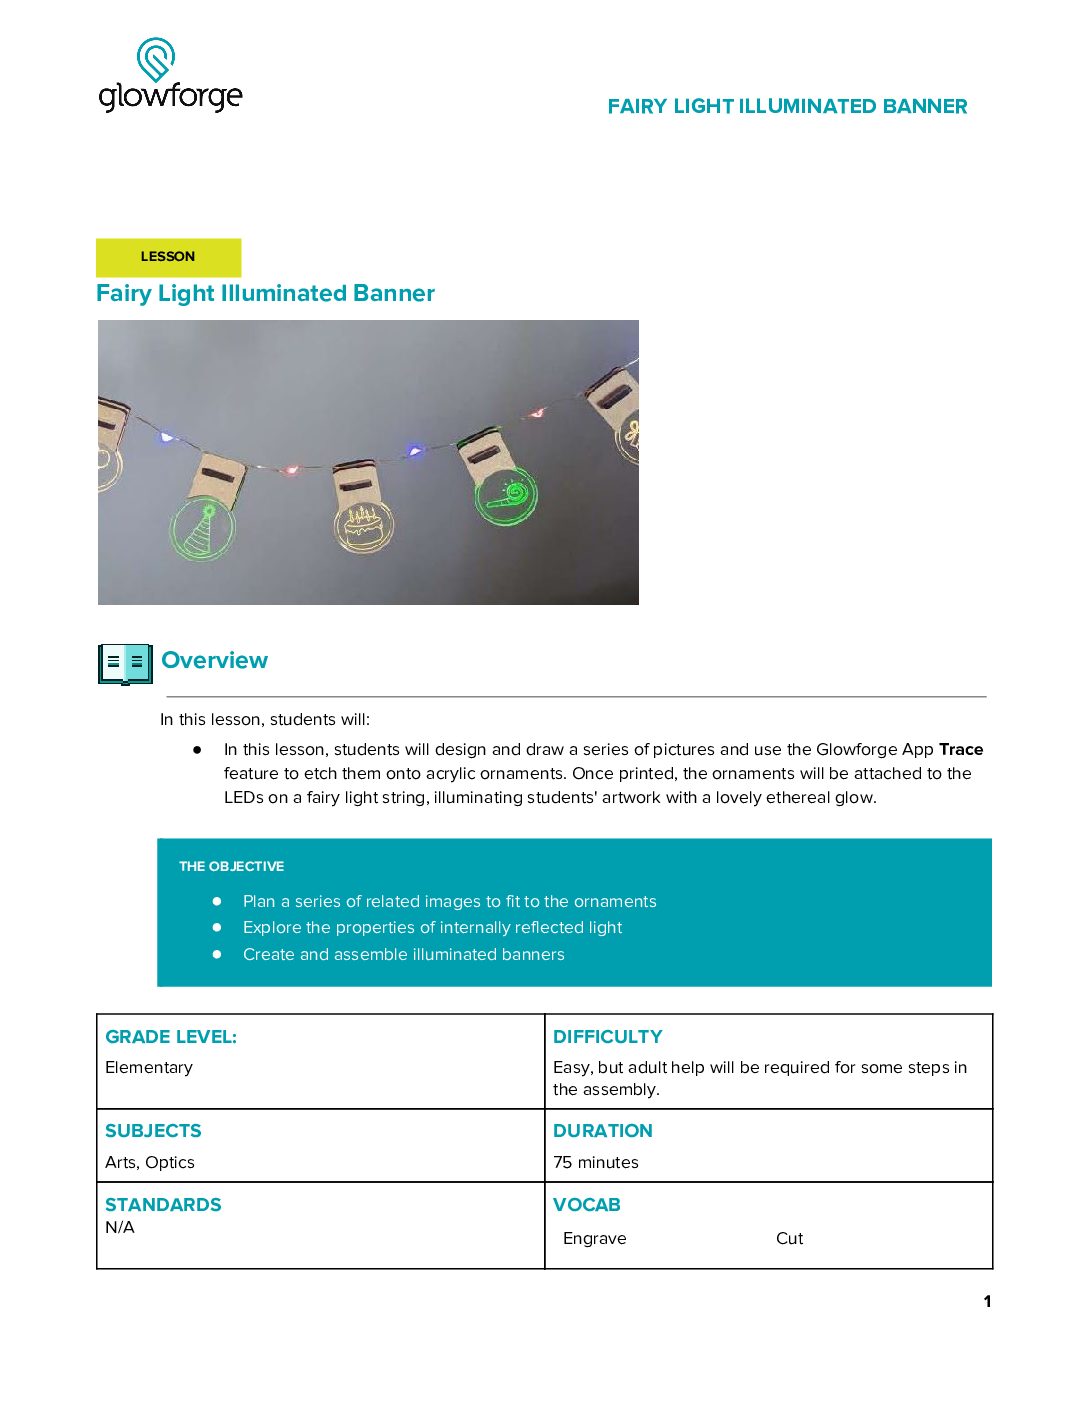
In this lesson, students will: In this lesson, students will design and draw a series of pictures and use the Glowforge App Trace feature to etch them onto acrylic ornaments. Once printed, the ornaments will be attached to the LEDs on a fairy light string, illuminating students’ artwork with a lovely ethereal glow.
Objective
Plan a series of related images to fit to the ornaments Explore the properties of internally reflected light Create and assemble illuminated banners
Supplies
- Glowforge App
- Proofgrade Medium Clear Acrylic
- Proofgrade Medium Draftboard or other ⅛” thick laserable wood
- Small strand of fairy lights with attached battery pack (e.g. https://www.amazon.com/gp/product/B084WQ3K46). Most strands will contain 20 fairy lights.
- Printed copy of the Ornament Design Sheet (OrnamentDesignSheet.pdf)
- Dark colored pen or pencil. A black fine point Sharpie is a good choice to produce a strong dark line
DESIGN FILES:
- ornaments.svg (attached below)
- clips.svg (attached below)
Design Files


Description
Lesson Outline:
Plan a group of illustrations to be included in the banner Draw the illustrations on paper Use the Glowforge Trace feature to print illustrations onto acrylic ornaments Print wooden clips to attach ornaments to fairy lights Assemble the banner by securing ornaments to fairly lights with clips
Lesson Instructions
Step 1: SETUP
Each student or group creating a banner will need a string of fairy lights, a printed copy of the Ornament Design Sheet, and a dark colored pen or pencil. Printing the ornaments and clips will require a sheet of Proofgrade Medium Clear Acrylic and Proofgrade Medium Draftboard.
Step 2: INTRODUCE & IDENTIFY THE LESSON
Light usually travels in a straight line, but inside certain materials, such as clear acrylic, it will bounce around inside the material, reflecting off the smooth inner surfaces, until it finds a rough, uneven surface through which to escape. This produces an effect known as “edge-lighting”, in which images etched into illuminated acrylic appear to glow from within, even though the light doesn’t shine on them directly. Ask students if they’ve ever encountered any edge-lit signs or decorations. This effect is often used in signage for dimly-lit areas. For example, the exit signs in movie theaters are often made of clear acrylic illuminated with green light. The entire sign is illuminated, but the glow appears to only emanate from the letters etched into the acrylic surface. Show the students the fairy light strand and explain that because the lights aren’t very powerful, each LED will only illuminate a small area. However, since each strand has many (usually 20) lights, students will be able to draw a series of pictures which will hang together in a long banner. Encourage them to think about different images which work well together in their banners.
Step 3: IDEATE
Plan the banners with the students. Each fairy light strand typically contains twenty lights. That’s a lot of ornaments to assemble, so it should be decided in advance how many ornaments will be on each banner. A realistic goal is to create ten acrylic ornaments and attach one to every other light in the strand. It is also possible to shorten a fairy light strand by cutting off the end furthest from the batteries, then seal the exposed wires with electrical tape or clear nail polish. Once the number of ornaments for each banner is set, ask students to think about collections of images they think would work together in their banners.
Step 4: CREATE
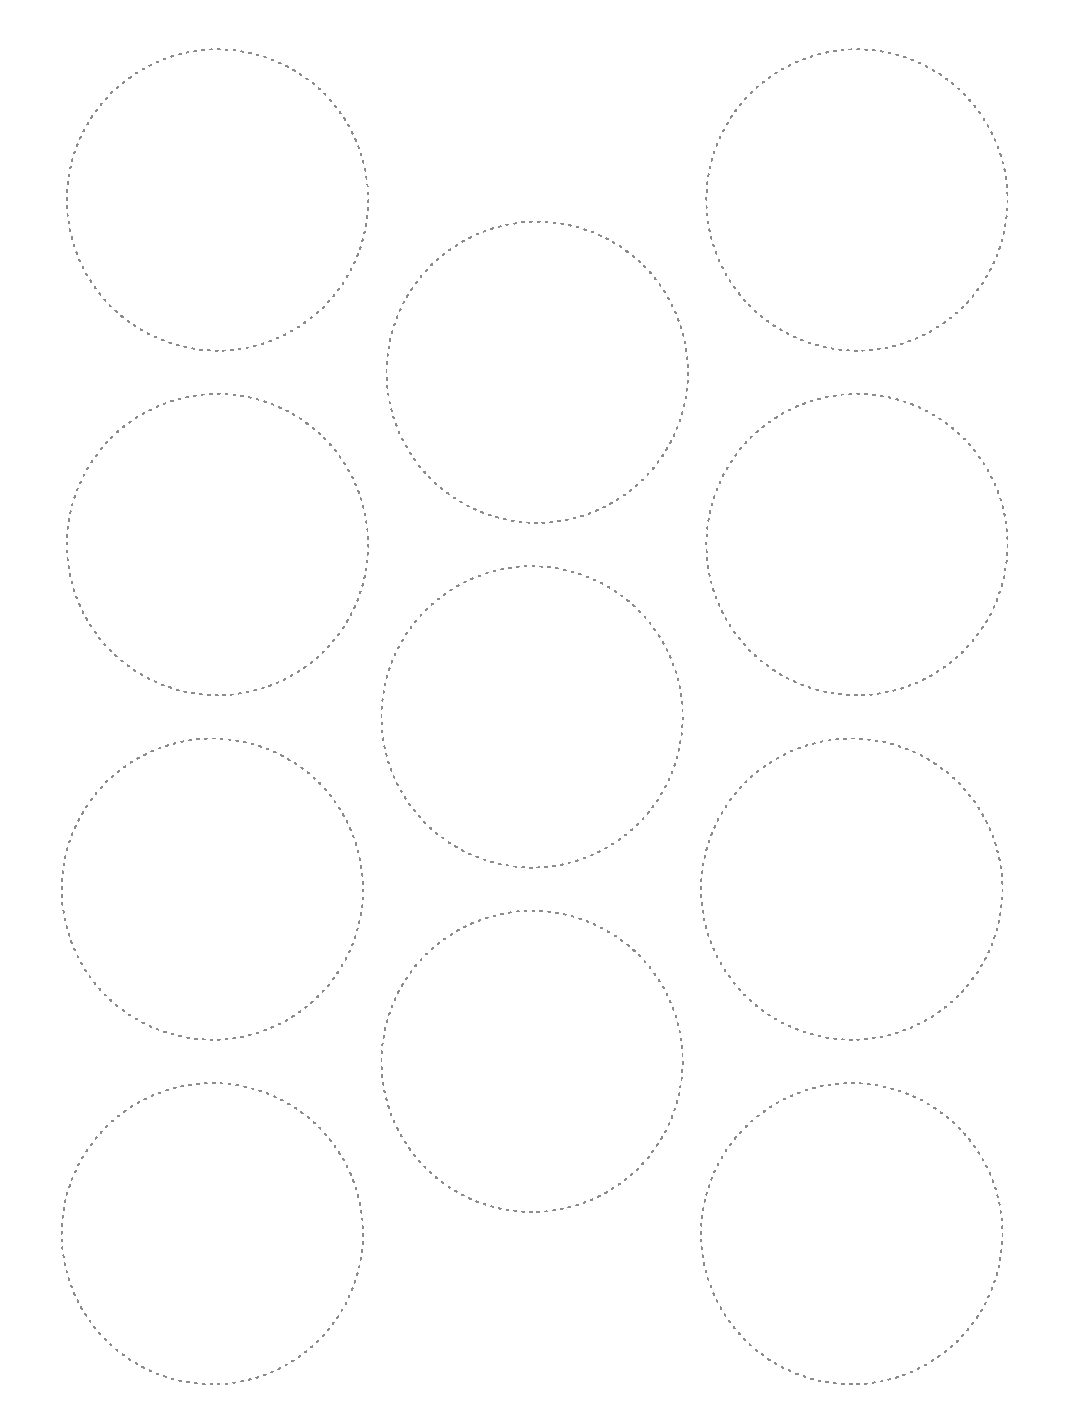
Draw Pictures for the Banners: Give each student a dark pen or pencil and a printed copy of the Ornament Design Sheet (OrnamentDesignSheet.pdf) in which to draw the pictures for their ornaments. A black fine point sharpie produces a thick, dark line which will create a nice visible image when scanned. Ask them to draw their pictures inside the faint circles. The circles on the Ornament Design Sheet are twice as large as the print area, so the pictures will be shrunk before being traced onto the acrylic. Any details that are *too* small may get lost. Images formed with thick, dark lines will show best in the edge-lit effect. Print Images on Acrylic Ornaments: Place the filled Ornament Design Sheet on the Glowforge print bed. Click the Import Artwork button in the Glowforge app and select Trace to use the Glowforge Trace Tool. When importing each image with the Trace tool, scan the image but *don’t* add cut lines. This posting from the Glowforge Community Forum explains clearly how to use the Trace Tool, without adding cut lines: https://community.glowforge.com/t/glowforge-interface-using-the-trace-tool/14074. It is important to be able to position each image independently, so you must repeat the scan process once for each image on the sheet. In each scan, be sure to crop the area to be scanned closely, so that it doesn’t include portions of other pictures on the sheet. After each image is scanned, place it anywhere convenient in the Glowforge app. It will need to be processed further before it is moved to its final position. 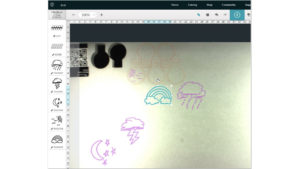 Once all images have been scanned, remove the Ornament Design Sheet from the Glowforge. Place a sheet of Proofgrade Medium Clear Acrylic on the print bed. Click the “Import Artwork” button and import the ornament design file, called “ornaments.svg” This file contains cut and score lines for ten ornaments. To use the acrylic material most efficiently, five of the ornaments are oriented upside down. If you don’t want to cut all ten ornaments, you can select and delete the extra ones from within the Glowforge App. In the ornaments, blue lines (ornament outlines) are cut lines and red lines (circles inside the ornament) are score lines.
 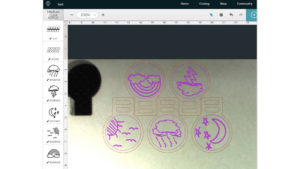 To position the pictures properly for printing, repeat the following process once for each ornament:
- Scale down the image until it fits inside the red circle in the center of an ornament. To make the image smaller, select it, then click on the small circle at the corner of the image outline and slide it towards the center of the image.
- After scaling, move the image into the center of the red circle in an ornament.
- If the ornament containing this image is oriented upside down, rotate the image, by grabbing the rotate tool (the circular arrow above the image) and dragging it around the image until the image is upside down as well.
- Edge lit effects look best when the etched image is on the *back* side of the acrylic. This reverses the image in the banner. To display the image as it is drawn, reverse the image before printing, by selecting the image and then clicking the flip vertical button in the Glowforge App.
Before printing the ornaments, be sure that all ornaments and images are aligned, and that the print settings for each element are correct. Images should fit within the red circles in each ornament. If the ornament is oriented upside down, be sure the image inside it is placed upside down as well. Be sure the images will be printed with the Engrave setting. The ornament outlines must be set to Cut and the circles in the body of each ornament should be set to Score. Double check that there are no cutlines within the images themselves. Once you are certain that the settings and alignment are correct, print the ornaments, remove them from the Glowforge and peel off all protective paper. Print the Wooden Ornament Clips: Remove the acrylic from the Glowforge and place a sheet of Proofgrade Medium Draftboard on the cutting bed. Import the design file for the wooden clips, named “clips.svg”. Each clip consists of three separate pieces arranged in a column inside the file. Printing the entire file creates ten clips. If you don’t need all ten, delete any extra from within the Glowforge App before printing. Print the clips and peel the protective paper. It’s very important to remove all the paper because the thickness of the clips must be exactly right to hold the ornament to the fairy lights. Attach Ornaments to Fairy Lights: 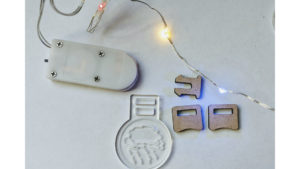 Arrange the ornaments for each banner in the order in which they are to be displayed. Unroll the fairy light strand and lay it out in a straight line. Three wooden pieces fit together to create one clip. The two identical rectangular pieces form the outer sides which “sandwich” the acrylic, and the smaller piece has two prongs which slide through the slots and secure the layers together.
 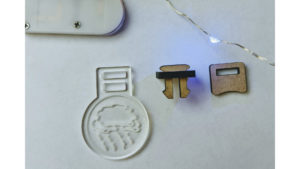 Lay the acrylic ornament in front of you with the engraved side facing upwards. This is the back of the ornament. Take the small clip piece with two prongs, and slide the prongs through the rectangular hole in one of the wooden rectangles as shown above. It may take a little steady force to push the prongs through the hole. Be careful not to push so hard the prongs break off.
 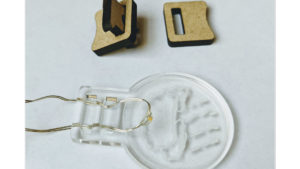 Next, take the fairy light strand, and slide a portion of the strand containing a single LED through the *lower* rectangular hole in the ornament. Thread the LED through the hole so that it passes through the ornament from beneath, starting at the smooth side of the acrylic and exiting upwards through the engraved side as shown.
 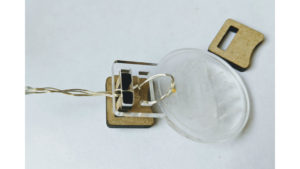 Holding the fairy light so that it doesn’t slip out of the acrylic, lift the acrylic ornament, and place it so that the top rectangular hole is just over the prongs of the wooden clip. Before pushing the ornament onto the clip, take the fairy light wires, hold them together, and slip them between the prongs as shown, so they emerge from the top of the clip. With the wires between the wooden prongs, and using steady but gentle force, push the ornament down over the clip until the ends of the prongs emerge through the hole in the ornament.
 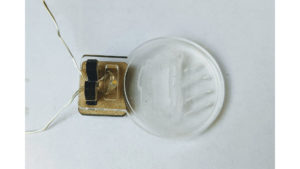 Before adding the final layer of the clip, gently retract the fairy light wires so that the LED slides upwards into the rectangular slot in the acrylic. Stop pulling when the LED is seated entirely within the lower rectangular slot in the ornament, as shown above. If necessary, push a bit on the LED with your fingertips or tweezers to seat it entirely within the slot.
 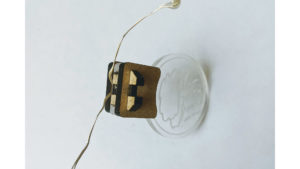 Next, lay the assembled portion of the ornament flat on a table with the clip prongs pointing upwards. Push the last layer of the clip gently but with steady force over the prongs until the ends of the prongs emerge through the rectangular hole. When all pieces of the clip are in place, they will secure the ornament firmly to the fairy light strand, and the ends of the strand will emerge through the top of the clip as shown. Repeat this assembly process for each ornament until the banner is completed.
Step 5: LIGHT IT UP AND TAKE A LOOK
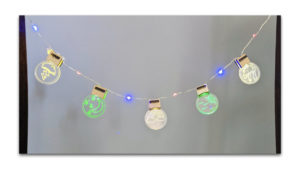 Once all ornaments have been attached to the fairy lights, orient the banner so that the etched sides of the ornaments face away from you. Turn the fairy lights on and observe the edge-lit effects. Even though the light shines from the top of the ornament, the brightest parts of the ornament are the etched portions of the surface. If they used different color fairy lights, ask the students whether they notice any differences in brightness or diffusion between the different colors of light. Notice which pictures are illuminated most effectively. Are small details visible? Do filled areas illuminate well, or do etched lines look better? How does the ornament appear different when viewed from the front side vs. from the back side. Now that they’ve seen their creation fully assembled, ask the students to think of other ways they might use this banner design (e.g. etch arrows on the ornaments to indicate direction, or draw letters and words to form a message). The edge-lit effect will be brightest in a dark room and may disappear almost entirely in the daylight. When complete, the banner may be hung on a wall or attached to the edge of a table for a festive decoration that gives hand-drawn artwork a little subtle extra glow.
Meet Glowforge
The magical 3D laser printer that made this lesson possible. Learn more!
