Grade Level
4, 5, and 6
Difficulty
Easy
Duration
1 hour
Subjects
English
Science
STEAM
Summer Camp
-
Cite specific textual evidence to support analysis of science and technical texts.
-
Determine the central ideas or conclusions of a text; provide an accurate summary of the text distinct from prior knowledge or opinions.
-
Follow precisely a multistep procedure when carrying out experiments, taking measurements, or performing technical tasks.
-
Evaluate reports based on data.
Vocab
The law of reflection
Reflected ray
Angle of reflection
Author
Glowforge
Licensing

Lesson for Download
Overview
In this lesson, students will: ● Cut and assemble the mirrors and stands ● Observe mirror symmetry and use a mirror to create symmetric shapes and pictures ● Observe the angle of reflected light ● Generate multiple reflections using two angled mirrors ● Use parallel mirrors to generate infinite reflections
Objective
Learn the rule governing the angle at which light reflects from a mirrored surface and conduct experiments to verify it under different conditions. Observe the way in which multiple mirrors generate multiple reflections of the same object. Experiment with the placement of multiple mirrors to observe changes in the display of the reflections
Supplies
- For each mirror/stand assembly:
- 1/8” (3.2mm) thick mirrored acrylic sheet. Each mirror is a square of approximately 5.5” per side
- 1/8” wood or acrylic sheet for the base
- 1x M3 screw between 12 and 16 mm long (or ½” 4-48 screw)
- 1x M3 nut (or 4-48 nut)
- Tools:
- Screwdriver
- For each mirror/stand assembly:
- 1/8” (3.2mm) thick mirrored acrylic sheet. Each mirror is a square of approximately 5.5” per side
- 1/8” wood or acrylic sheet for the base
- 1x M3 screw between 12 and 16 mm long (or ½” 4-48 screw)
- 1x M3 nut (or 4-48 nut)
Design Files


Description
Lesson Outline:
Light is fast but predictable. Though it usually travels in a straight line, light reflects off mirrors in much the same way that a ball bounces off a wall. While light travels too quickly to be viewed directly, we can determine its path by observing the way it bounces off of objects and mirrors to form reflections. To conduct the explorations in this lesson, students will construct their own free standing mirrors from reflective acrylic. Mirrored acrylic is lightweight, easy to shape with a laser cutter, and won’t shatter as easily as a glass mirror. This lesson contains a number of different explorations, but students will undoubtedly discover their own original ways to use the mirrors as well.
Lesson Instructions
Introduction
History of mirrors
People have seen their mirror image for a long time in dark pools of water, rivers and lakes. Mirroring was considered some kind of magic. Over 2000 years ago Egyptians, Greeks, and the Romans made mirrors of pieces of polished metal, usually silver and sometimes bronze. Glass was discovered by the Phoenicians around 5000 BC but only during the Roman times people in Sidon (Lebanon) made the first glass mirrors by putting some metal at the back of glass. Glass blowing was discovered during Roman times but only in the 12th and 13th century AD a glass industry developed in Venice and Southern Germany/Bohemia. Mirrors were produced too, but they were very expensive. Therefore the mirrors in the palace of Versailles were very special and a sign of opulent wealth and power. From the 17th century mirrors were used more and more as decoration. Starting in the 19th century mirrors became much cheaper thanks to new technology and entered the houses of common people. Nowadays the metal at the back of mirrors usually is a thin layer of aluminum.
Two kinds of reflection
When you shine light from a laser pen or flashlight on the ceiling, everybody in the room can see the light spot on the ceiling. This means that the light rays of the flashlight which are coming from one direction, are reflected or “scattered” by the ceiling in all directions and enter the pupils of the eyes of all present. This is called diffuse reflection (Figure 2b, 3b). Diffuse reflection occurs with all objects around us except for shiny objects like mirrors. When you shine the light from a laser pen or a narrow and parallel beam of light from a flashlight onto a mirror (please try the set up of figure 31 ), then quite surprisingly one does not see a light spot on the mirror. The light beam is reflected in a particular direction and can only be seen in that direction. This is called specular reflection but with children we just call it mirror reflection (Figure 2a and 3a). Mirrors have a very smooth surface. In figure 3a we caught this reflection on a piece of paper. On the other hand, when we shine the light of a laser pen on paper, the light spot can be seen from all directions.
Step 1: Assembly Instructions
The exercises in this lesson require two plain mirrors (BasicMirror.svg) and one mirror with a hole in the center (MirrorWithHole.svg). All mirrors should be cut from 1/8” mirrored acrylic. Warning: When using a laser cutter with mirrored acrylic, be sure that the reflective side of the mirror is facing downwards or is masked with protective paper. Otherwise the laser can reflect upwards in an unsafe manner during cutting. Cut and attach a stand to each mirror, to allow it to stand upright on any flat surface. Each mirror uses a single stand (MirrorStand.svg) cut from 1/8” wood or acrylic sheet. 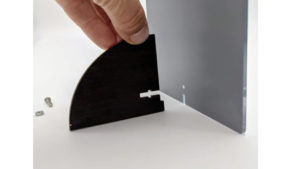 After removing any protective paper from the pieces, connect each mirror to its base by aligning the base perpendicular to the rear of the mirror as shown. The base has a small protruding tab which fits into the vertical slot at the bottom of the mirror.
 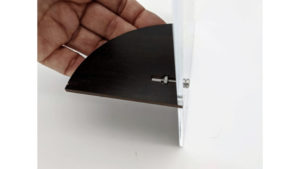 Slide an M3 nut into the crosswise “notch” in the base and insert an M3 screw through the hole in the front of the mirror. When the end of the screw reaches the nut, twist it gently with your fingertips to engage the nut. Once secure, finish tightening it with a screwdriver.
Step 2: Explorations Bilateral Symmetry
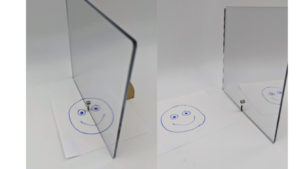 Mirrors display exactly what is put in front of them, but the reflection is reversed across the plane of the mirror’s surface. Have students draw a picture that is bilaterally symmetric (identical across a line down the center). The smiley face shown above is one example. Place the picture under the mirror so that only half the image extends in front of the mirror. Does the picture look the same as it did before? Which image is more perfectly symmetric – the one drawn entirely on paper or the one formed by half the drawn picture along with its reflection? Why?
 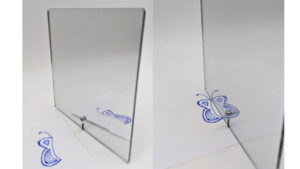 Challenge students to create an image by only drawing half of a picture that becomes complete when placed next to a mirror.
Step 3: Complete the Loop with Symmetry
Cut a length of wire or pipe cleaner about 4 inches long. Instruct students bend the wire so that when the ends are placed against the mirror, the wire together with its reflection form a closed shape. A circle and a square are shown above. Are the segments of wire which comprise each side of the square all the same length? What is the difference in length between the side parallel to the mirror and the sides perpendicular to the mirror? Challenge students to form more complex shapes such as a triangle, diamond, heart or star. 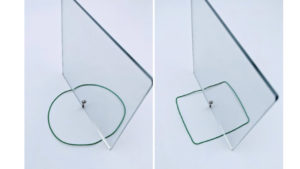
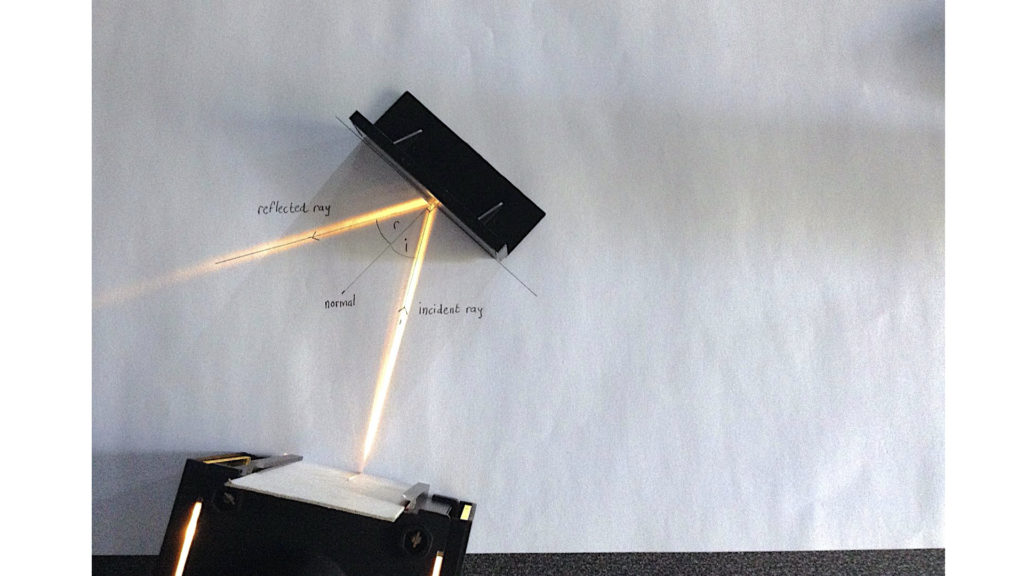
Step 4: Reflection Angle
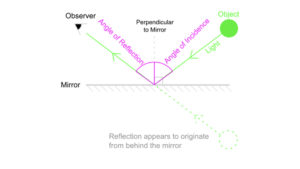 Light likes to travel in a straight line, but when it encounters a reflective surface, it bounces away from the surface at the same angle it made coming towards it. The angle the light makes with a perpendicular when moving towards the mirror is called the angle of incidence and the angle the light makes moving away from the mirror is called the angle of reflection. In optics, we say that when light reflects, the angle of incidence equals the angle of reflection.
 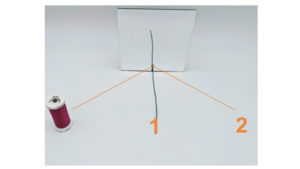 We can observe this phenomenon qualitatively with a single mirror by placing an object (the spool seen in the picture above) in front of the mirror. Close one eye and look at the mirror with your open eye keeping your eye the same distance away from the mirror as the object. With your eye at position 1, the object’s reflection won’t be visible in the mirror. As your eye moves towards position 2, the object’s reflection will come into view. When that happens, your eye is in the path of light which bounces off the mirror after leaving the object.
Extension: Here’s Looking at You:
This observation requires two participants – called ONE and TWO. Give ONE a mirror and ask them to hold the mirror in such a way that ONE can see a reflection of TWO’s face. Ask TWO to look in the mirror that ONE is holding. Can TWO see a reflection of ONE’s eyes? Challenge ONE to find a way to view a reflection of ONE’s face without TWO being able to see ONE’s eyes. It is impossible. Ask the participants to use what they’ve learned about light reflection to explain why it can’t be done.
Step 5: Multiple Reflections
 Place a second mirror at an angle to the first with edges aligned to form an angle as shown above. Place a small object between them. How many copies of the object can you see? What happens to the number of reflections when you decrease the angle between the mirrors? What happens when you increase it?
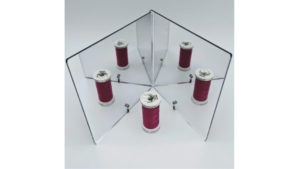
Infinite Reflection:
This exploration requires the mirror with the hole in the center and one regular mirror. Place both mirrors on a table. Peek through the hole. You may have to set the mirror with a hole in it at the edge of a table to more easily lower your eye to the hole. Can you see your own eye looking back at you? How many reflections of your eye can you see? 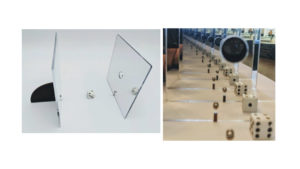 Now place an object between the two parallel mirrors. It is best to use an object with a front side which appears distinct from its back side. Look through the hole at the reflections of the object in the mirrors. Is only one side of the object visible or do the reflections show both sides? Note that the reflections of the front and back of the object appear to alternate. If the mirrors are not exactly parallel to one another, the reflections will appear to curve off into the distance as they recede, as in the second picture above. Does this mean that the reflected light is curving, or is there a different explanation for this phenomenon? Ask the students to speculate on what causes this effect.
Step 6: Evaluate and Further Reflection
Discuss what the students’ observations have revealed about the way light reflects in a mirror. Ask the students to think about ways mirrors work in the following scenarios.
- Can you use mirrors to view the back of your own head?
- Could you set up a system of mirrors in some way to observe others without them knowing they were being observed? Would you have to use other materials to accomplish this?
- If you view a photograph of yourself next to your reflection in a mirror, are you seeing the same view in both images, or are they different?. Which image – reflection or photograph – shows you in the same way that others see you?
Meet Glowforge
The magical 3D laser printer that made this lesson possible. Learn more!
