Grade Level
K, 1, 2, 3, 4, 5, 6, 7, 8, 9, 10, 11, and 12
Difficulty
Easy
Duration
1 hour
Subjects
Art
Craft
Drama
Entrepreneurship
Fun
STEAM
-
Students use a variety of technologies within a design process to identify and solve problems by creating new, useful or imaginative solutions.
Vocab
Interactive Storytelling
Community
School Spirit
Author
Glowforge
Licensing
Overview
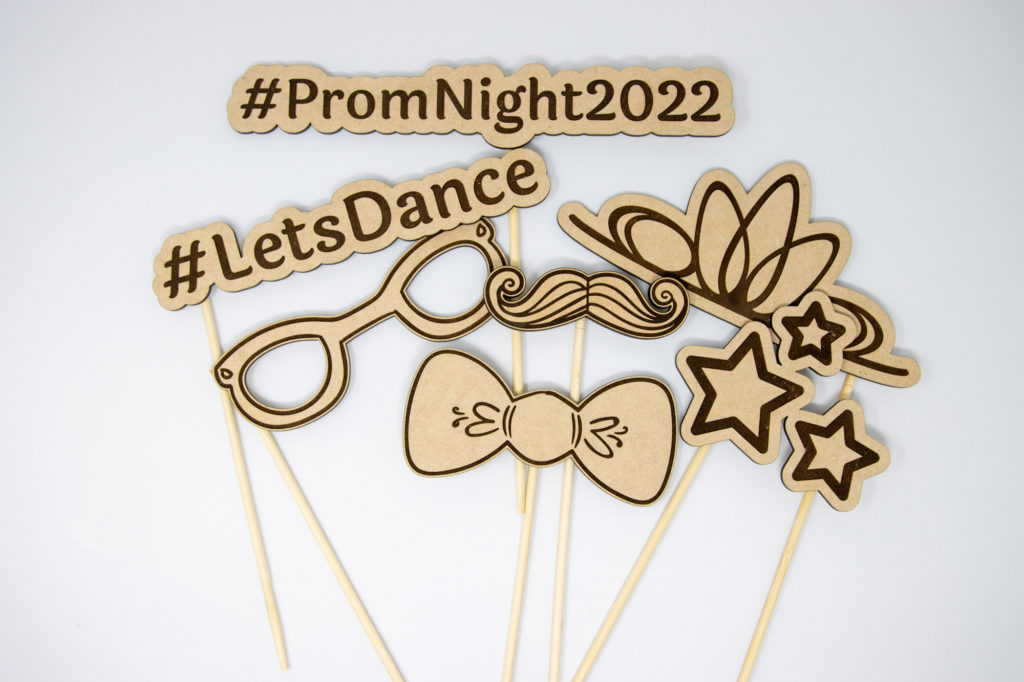
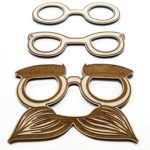
Strike a pose and say cheese! Photo booth props help us find creative, silly, and unique ways to bond while taking photos with friends and classmates. With the Glowforge app, you can customize and create your own ready-to-use, fun photo booth props. Use these designs to create and capture magical moments in your classroom or school community!
Objective
Students will…Thematic Questions:
Outcomes:
Standards:
ISTE Standards for Students
Supplies
Material amounts will vary based on which designs are printed.
- Paper and markers to create your designs
- Draftboard (Unfinished) or cardboard
- Materials for customizing Multiuse Photo Booth Props (e.g., markers, stickers, pens, or paint)
- Wood glue
- Popsicle stick or other rod to hold prop
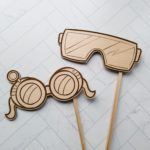
Catalog Designs
For this activity, you will use the Trace and Print Tool to turn your idea into a design. Here are examples of existing photobooth prop designs. 
Description
Lesson Outline:
Get Ready:
- Read through the activity details to familiarize yourself with the steps to complete the activity.
- Gather all of the materials needed to print, assemble, and customize Multiuse Photo Booth Props.
- The Glowforge catalog has many great photo booth designs that students can use in addition to the custom ones that the students design. Explore the Glowforge Design Catalog and resources for existing photo booth designs to print or as inspiration.
- For this activity, you will use the Trace and Print Tool to turn your idea into a design.
Production Time:
Print times will vary based on your designs. Assemble – 1 minute
Rubric:
Use this optional rubric for student self-reflection or formative feedback throughout the Multiuse Photo Booth Props experience. 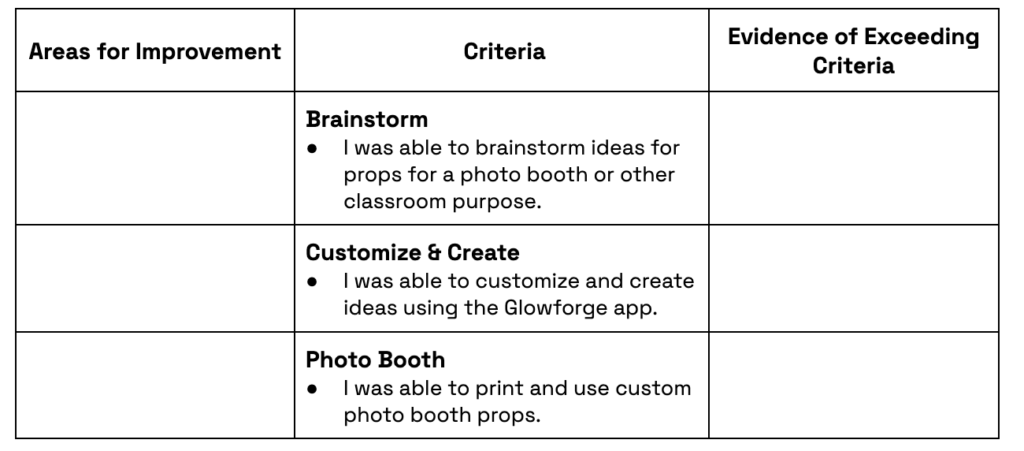
Lesson Instructions
Section 1 – Plan:
- Explain that the class will create a photo booth and customized photo booth props to help celebrate an upcoming school community event such as homecoming or spirit week.
- Ask: “What important school community events might be more fun with a photo booth?” and “How do these events foster community?” Give students time to discuss their thinking in small groups or as a class.
- As a class, use a whiteboard or chart paper to brainstorm how to address the following aspects of a photo booth:
- Theme
- What is the theme of your event?
- How might you incorporate the theme into the design of your photo booth and event?
- Consider the school mascots, symbols, character traits, slogans, or other school community characteristics to help represent your theme.
- Photo Booth
- What will you use to take the photos? How will you display the photos afterwards?
- Where in your school will you set up the photo booth?
- Will your photo booth have a backdrop? Could you use a green screen to create a virtual background?
- Theme
- Have students work collaboratively to sketch out and design the photo booth area for spirit week or other school community event.
- Have students form small groups of 3-5 students each. Ask groups to consider the theme of the event and think about fun props to include in the photo booth. Guide students with questions such as:
- What types of props do we want to create for the photo booth?
- What props would be fun to include in our photo booth?
- How do these props align with our chosen theme?
- Ask each group to select 2-3 items that they are excited to transform into photo booth props. Have groups sketch out their ideas for these props on paper.
Section 2 – Customize and Create:
Have groups…
- Determine how they want to represent their ideas using the Glowforge app’s icon library or Trace and Print tool. Students may also use a third-party software, like Inkscape, to create their own icons and images.
- In addition to creating props to hold in photos, consider creating signage to decorate the set, and explain the theme of the photo booth.
- If adding artwork in the Glowforge app:
- Create a new design in the Glowforge app.
- Click the + button and search for the desired icons.
- If using the Trace and Print Tool:
- Sketch design plans using paper and pencil.
- Provide feedback within the group to refine plans prior to moving onto the next step.
- After incorporating peer feedback and finalizing plans, go over the pencil drawings with a black marker.
- Use the Glowforge app’s Trace and Print tool to bring their props to life
- Consider if any design elements need an outline around them to signify cuts. If an outline is needed, use the Glowforge app’s Outline Tool to create a new outline. Adjust the size of the outline between the recommended 1/8th to 1/4 inch (3-6mm).
- Print, decorate, and assemble their photo booth props by connecting the props to popsicle sticks or other rods with tape or glue. Afterwards, use art supplies such as paint to decorate the props.
Section 3 – Use:
Ask students to…
- Assemble the photo booth for their event including the background, theming materials, camera, and their photo booth props.
- Facilitate the photo booth during the event.
- Collect the photos in a digital school photo album or create a school spirit hashtag to use to post the photos on social media. Be sure to follow the school’s photography release policy when sharing images.

Reflection Questions:
Help students consider…
- How did the icons, symbols, and phrases help us to represent our school community?
- What are other events, experiences, or uses for a photo booth or fun props?
Pro Tips:
- Explore the Glowforge app’s robust artwork library and the Glowforge Design Catalog and resources for ready-to-use icons and images that make fun photo booth props.
- Consider other materials, such as different colored acrylics, that you could use for your props. When choosing materials, make sure to use ones that are laser compatible. You can learn more about what materials are compatible with Glowforge here.
- Creating props for your photo booth is just the start. Ask students to imagine what else they could create to make their photobooth stand out and be a success. Welcome signs, a donation box, or storage for the props could be useful and challenging projects.
Reimagine:
- How could we use our photo booth props as a fundraiser or as a business opportunity? How could the props help us to convey emotions, feelings, and thoughts? Use a photo booth prop as a visual representation of what you are attempting to express.
Remix:
- Teach others about a literary or historical figure by creating props that represent a person. Create facial features, possessions, or symbols that highlight personality traits using the Glowforge app’s icon library and Trace and Print tool.
- Whether it’s paintbrushes for the art classrooms, books for the English department, or favorite plants for the school garden, visual cues can help everyone find their way around the school.. Guide classmates and visitors by creating printed icons that can be displayed to visually represent locations.
- Let your inner prop master shine. Connect with the theater department to design custom props for the school’s next production of Hamlet or Into the Woods. From Yorick’s skull to Juliet’s masquerade mask, the Glowforge app and your imagination can help set the stage for your theater department’s next production.
Meet Glowforge
The magical 3D laser printer that made this lesson possible. Learn more!
