Grade Level
3, 4, 5, 6, 7, 8, 9, 10, 11, and 12
Difficulty
Easy
Duration
30 minutes
Subjects
Art
Biology
Design & technology
Engineering
Mathematics
STEAM
-
Students critically curate a variety of resources using digital tools to construct knowledge, produce creative artifacts and make meaningful learning experiences for themselves and others.
-
Students develop and employ strategies for understanding and solving problems in ways that leverage the power of technological methods to develop and test solutions.
-
– Asking Questions and Defining Problems
– Developing and Using Models
– Planning and Carrying Out Investigations
– Analyzing and Interpreting Data
– Using Mathematics and Computational Thinking
– Constructing Explanations and Designing Solutions
– Engaging in Argument from Evidence
– Obtaining, Evaluating, and Communicating Information
Vocab
Spirograph
Curves
Radius
Least Common Multiple
Radial Symmetry
Patterns
Reflections
Author
Glowforge
Licensing

Lesson for Download
Lesson Handout
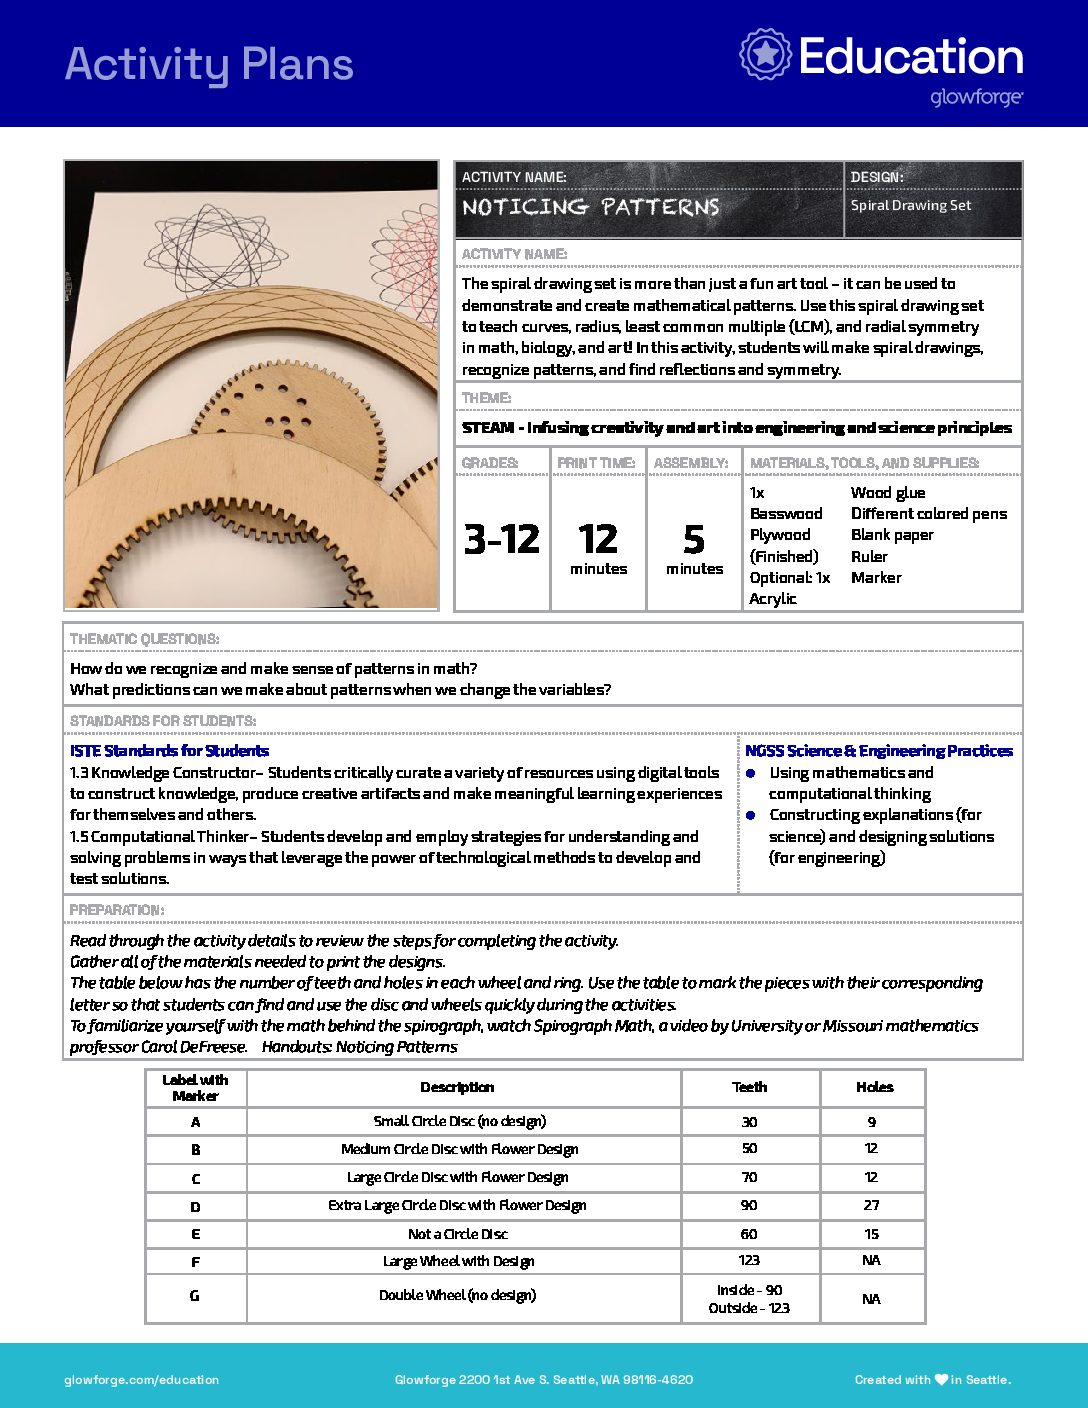
Overview
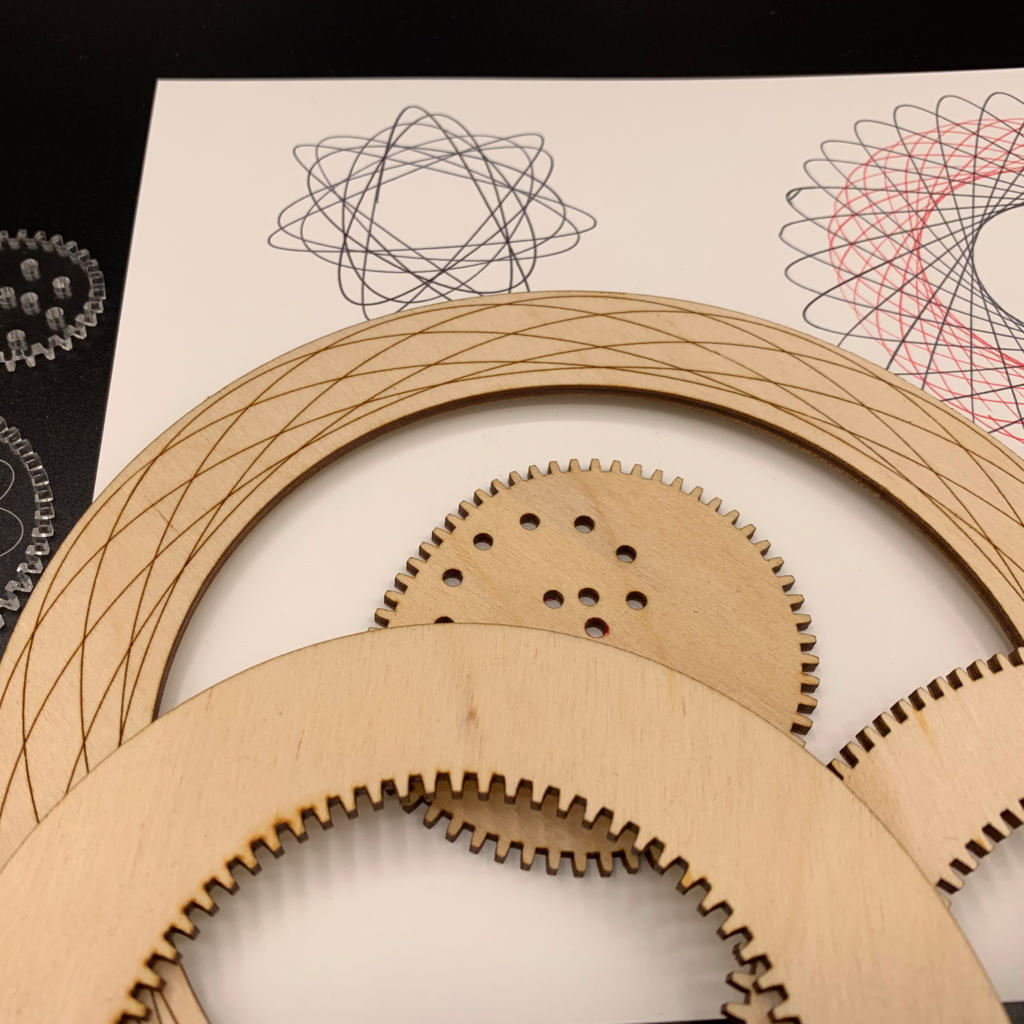
The spiral drawing set is more than just a fun art tool – it can be used to demonstrate and create mathematical patterns. Use this spiral drawing set to teach curves, radius, least common multiple (LCM), and radial symmetry in math, biology, and art! In this activity, students will make spiral drawings, recognize patterns, and find reflections and symmetry.
Objective
Thematic Questions:
Standards:
ISTE Standards for Students
NGSS Science & Engineering Practices
Supplies
- 1x Basswood Plywood (Finished)
- Optional: 1x Acrylic
- Wood glue
- Different colored pens
- Blank paper
- Ruler
- Marker
Catalog Designs

Description
Lesson Outline:
Get Ready:
- Read through the activity details to review the steps for completing the activity.
- Gather all of the materials needed to print the designs.
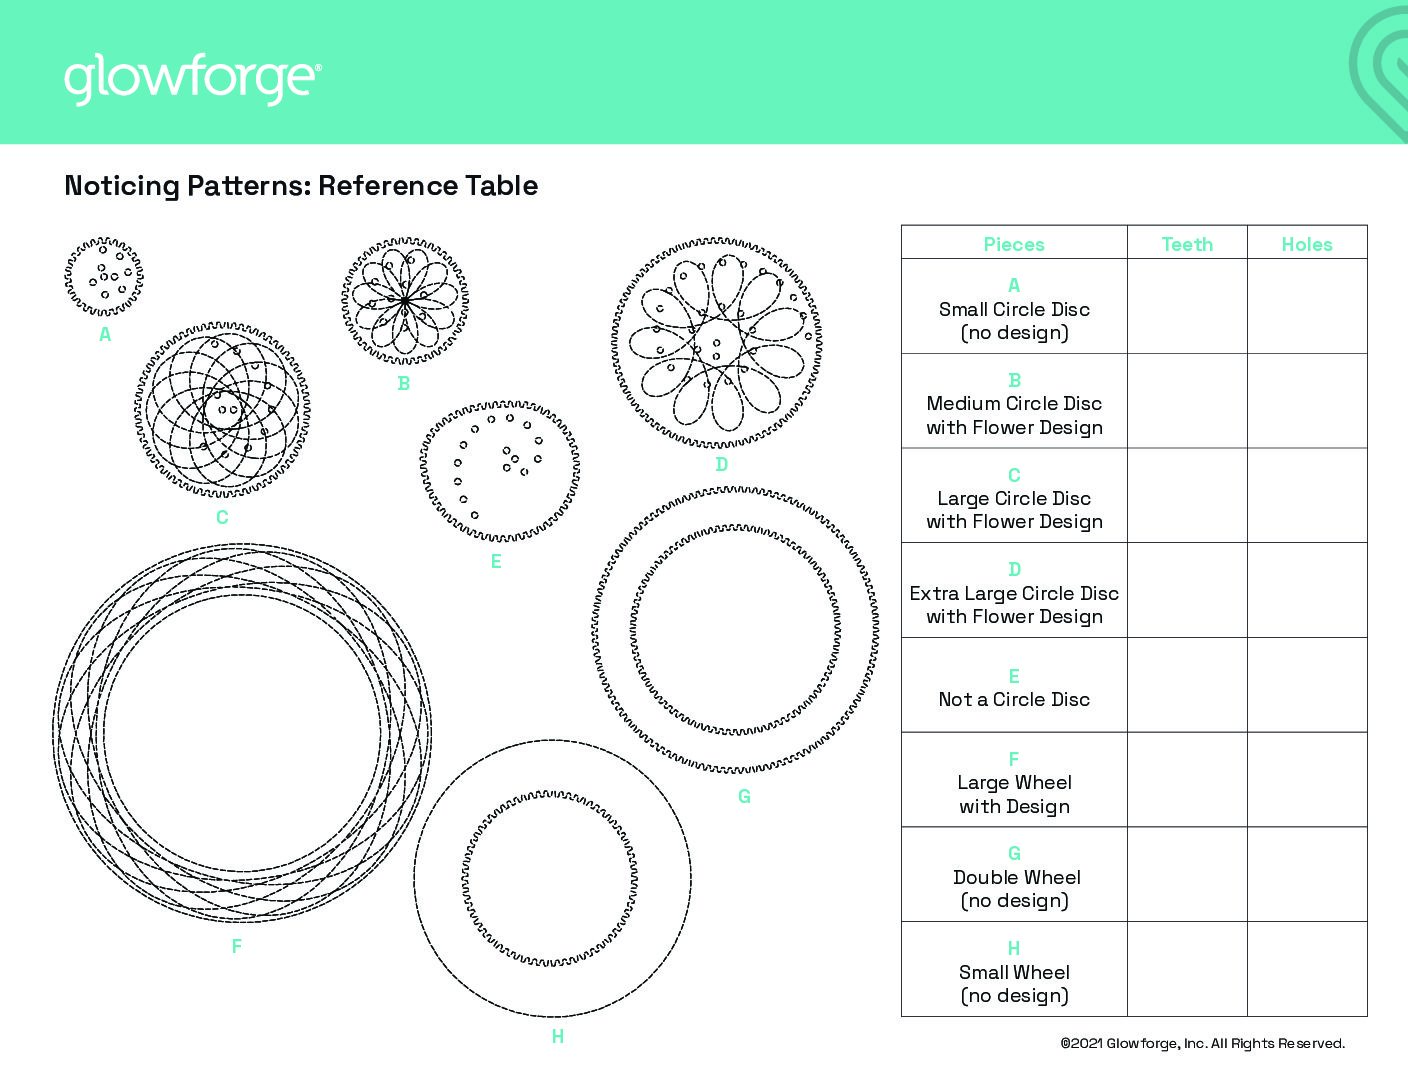
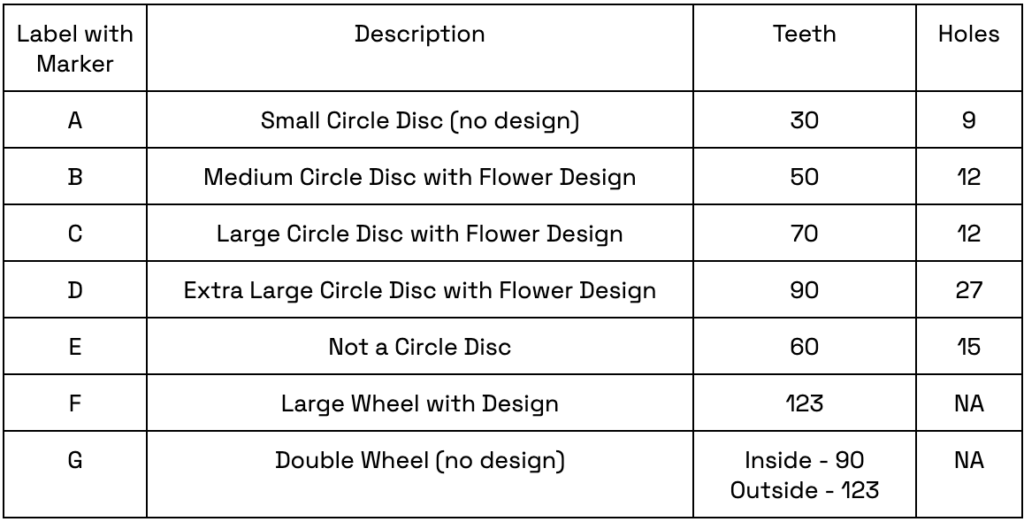
- The table below has the number of teeth and holes in each wheel and ring. Use the table to mark the pieces with their corresponding letter so that students can find and use the disc and wheels quickly during the activities.
- To familiarize yourself with the math behind the spirograph, watch Spirograph Math, a video by University or Missouri mathematics professor Carol DeFreese.
Production Time:
Print – 12 minutes Assemble – 5 minutes
Lesson Instructions
Section 1 – Create:
- Plan for printing the Spiral Drawing Set by gathering all of the materials and reviewing the design in the Glowforge app.
- Create the Spiral Drawing Set by following the steps of the Spiral Drawing Set design project to print and assemble its parts.
- Mark each wheel and disc with its corresponding letter using a marker and the table.
- Mark one tooth with the marker on each wheel and disc to help students count the revolutions.
- Ask: “Are you familiar with a spirograph?” Students may or may not be familiar with the spirograph. Use the spiral drawing set to create a simple drawing to show students.
- Print out one of the Noticing Patterns: Reference Guide handouts for each group. Determine whether you will provide the data to the students beforehand or if you will have them record the data on the reference guide by counting the teeth in each disc and wheel themselves.
- Print out one Noticing Patterns: Data Collection Table handout for each student.
Section 2 – Use:
Introduce the parts of the set and terms related to it. 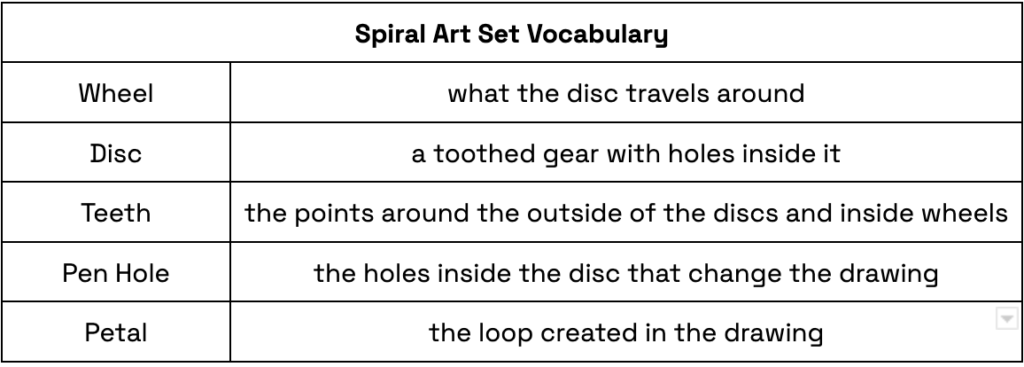
- Explain that these tools can create beautiful spiral drawings and there are 3 variables to changing the spirals:
- The radius of the fixed disc or wheel, or the number of teeth in the wheel.
- The radius of the revolving disc, or the number of teeth in the disc.
- The location of the pen holes inside the moving disc.
- Have students form small groups of 2-3 students each.
- Pass out sets, paper, and colored pens or markers, and the handouts to each group. Encourage students to take turns creating a drawing. They can use any combination of discs, colored pens, and pen holes to create their initial drawings.
- Give the students time to explore different-sized wheels and discs and the pattern each makes. If using the Reference Guide handout as an exploration activity, have students count the teeth of each wheel and disc and record it on the reference chart.
- Ask: “What do you notice when you change one of the variables?” and “How does the drawing change?” Give students time to think and time to share their ideas with others.
- Introduce these math terms:
- Hypocycloid: a pattern created by a point on a disc rolling inside a wheel.
- Epicycloid: a pattern created by a point on a disc rolling outside a wheel or another disc.
- Have students work in groups to create one of each type of pattern. Have them label their drawings with the type of pattern and the wheel or disc they used to create it.
- Once each group has created their patterns, ask: “What do you notice?” and “What do you wonder?” Record student answers on the whiteboard or a sheet of poster paper.
- Have students count the petals of one of their patterns and record it under the drawing.
- Ask students to use a ruler to draw a line in a contrasting color pen bisecting the pattern between two petals.
- Ask: “What do you notice?” Students should recognize a line drawn anywhere through the drawing creates a reflection and because the line can bisect in multiple directions this is an example of radial symmetry.
- Ask students to create three more drawings using only one disc (A-C) for their fixed disc and three different rotating discs (A-D). Have students line up the marked tooth on the fixed disc to the left of the marked tooth on the rotating disc. Tell students to move the disc slowly around the fixed disc and count revolutions each time the marked teeth pass each other. Have them record the variables of their drawings in a table like the example below. Their fixed disc should remain the same for each drawing.
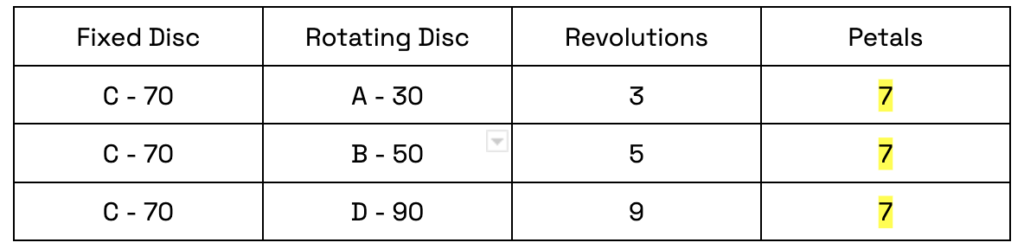 14. Ask students to share their table with others. Ask: “What do you notice?” Students should recognize that the number of petals will also be the same when using the same fixed disc.
15. Now ask students to create three more drawings, this time only using one disc (B-D) for their rotating disc and three different fixed discs (A-D). Have students record the variables of their drawings in a table like the example below. Their rotating disc should remain the same each time. 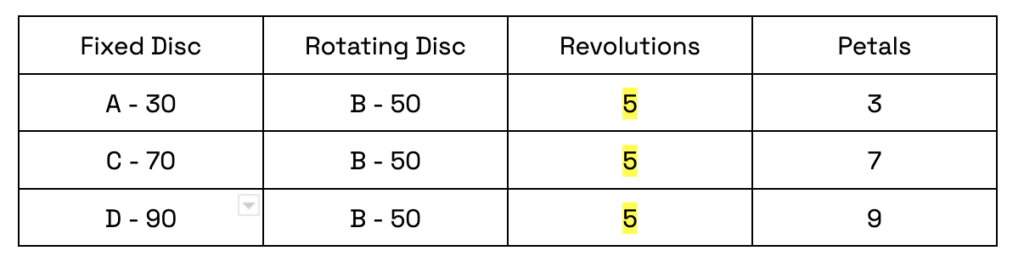 16. Give students time to share their table with others. Ask: “What do you notice?” Students should recognize that the number of revolutions will be the same when the rotating disc also stays the same.
17. Ask students to look back at all the data they collected on their tables and the observations they made. Give students time to share an interesting piece of their learning from the activity. 
Reflection Questions:
Help students consider…
- Patterns can be assessed and explained by mathematics. What patterns did you notice during this activity?
- How did your drawing change depending on the size of the disc and the wheel? Also, how was the drawing affected by the hole in the disc that you chose?
- For students studying higher-level math concepts:
- What kind of formula would help you calculate how many revolutions it would take to complete a drawing?
- What kind of formula would help you determine the outcomes of your drawings before you drew them? What might influence that formula?
Pro Tips:
- Use the ‘Add Text’ option to engrave the label on the disc and wheels before printing out the Spiral Drawing Set.
- Encourage students to use the holes closest to the edge of the disc as it will provide a more prominent petal, making it easier to count and see the reflections.
- If the drawing is too compact, have students count the inside points of the drawing instead of the petals. They may be easier to discern.
- Provide high contrasting color pens or markers to make it easier for students to see different patterns and to create bisections.
- To create bigger spirals, select all of the printed parts and scale them up until the biggest wheel is as large as it can be. Then drag each of the rings to reposition them on the material. As the rings use a toothed gear, it’s important to scale each part equally so the teeth can still engage properly.
Reimagine:
- How can we incorporate hands-on investigations for more challenging math concepts? Use the Spiral Drawing Set to introduce least common multiple (LCM) and explore the drawings it creates for formulas to determine the number of revolutions and petals for various sized disc and wheel combinations. Also, use spiral drawings to teach concepts around modular arithmetic and fundamental theorems of mathematics.
- Have students engage in a design challenge. For example, create a new wheel or ring in the Glowforge app to make additional drawings and test theories about LCM.
- How can a spiral drawing set be used in art class? Use the Spiral Drawing Set to demonstrate radial symmetry designs by coloring in the drawings created with the spiral drawing set using a repetitive color motif.
Meet Glowforge
The magical 3D laser printer that made this lesson possible. Learn more!
