Grade Level
3, 4, 5, 6, 7, 8, 9, 10, 11, and 12
Difficulty
Intermediate
Duration
1 hour 30 minutes
Subjects
Business Studies
Citizenship
Commerce
Design & technology
Engineering
Entrepreneurship
STEAM
-
Students use a variety of technologies within a design process to identify and solve problems by creating new, useful or imaginative solutions.
-
Students develop and employ strategies for understanding and solving problems in ways that leverage the power of technological methods to develop and test solutions.
-
– Asking Questions and Defining Problems
– Developing and Using Models
– Planning and Carrying Out Investigations
– Analyzing and Interpreting Data
– Using Mathematics and Computational Thinking
– Constructing Explanations and Designing Solutions
– Engaging in Argument from Evidence
– Obtaining, Evaluating, and Communicating Information
Vocab
Organization
Efficiency
Stock Rotation
Prototype
Design Thinking
Author
Glowforge
Licensing
Lesson for Download
Overview
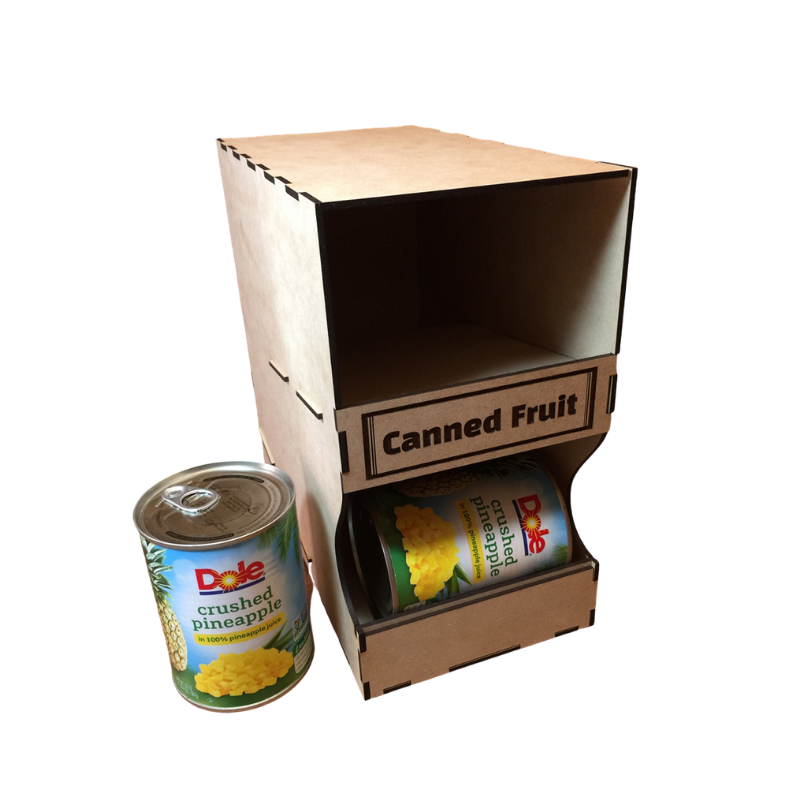
In this activity, students work collaboratively to design and print storage containers that help concession stands use their space more efficiently in order to prioritize organization and stock rotation. The focus is on a concession stand or a fundraiser but the organizational fun doesn’t have to stop there! Students can use these designs to help organize other spaces in the school, like lockers, the school store, offices, or even theater arts and music spaces.
Objective
Students will…Thematic Questions:
Outcomes:
Standards:
ISTE Standards for Students
NGSS Science & Engineering Practices
Supplies
- Large Pantry Dispenser – 1x Medium Plywood or Draftboard (Unfinished)
- Granola Bar Dispenser – 1x Walnut Plywood (Finished)
- Granola Bar Dispenser – 1x Clear Acrylic (Cast, Transparent, Glossy)
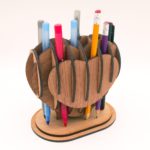
- Hearty 3D Pen Holder – 2x Draftboard (Unfinished)
- Wood glue
- Rubber mallet or hammer with a tapping block
- Rulers or tape measures
- Poster paper
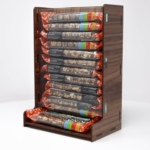
Catalog Designs

Description
Lesson Outline:
Get Ready:
- Read through the activity details to review the steps for completing the activity.
- Gather all of the materials needed to print the designs.
- Print and assemble the sample designs the students will be exploring ahead of time.
- Gather information on concession stand items that need to be organized.
- Acquire access to a .png or .jpg file of the school logo or mascot for branding purposes.
- Note that students’ final print designs will likely require more Proofgrade materials based on the design and the type of material needed.
Production Time:
- Large Pantry Dispenser – 21 minutes
- Granola Bar Dispenser – 8 minutes
- Hearty 3D Pen Holder – 12 minutes
Assemble
- Large Pantry Dispenser – 10 minutes
- Granola Bar Dispenser – 5 minutes
- Hearty 3D Pen Holder – 10 minutes
Rubric:
Use this optional rubric for student self-reflection or formative feedback throughout the Operation Organization experience. 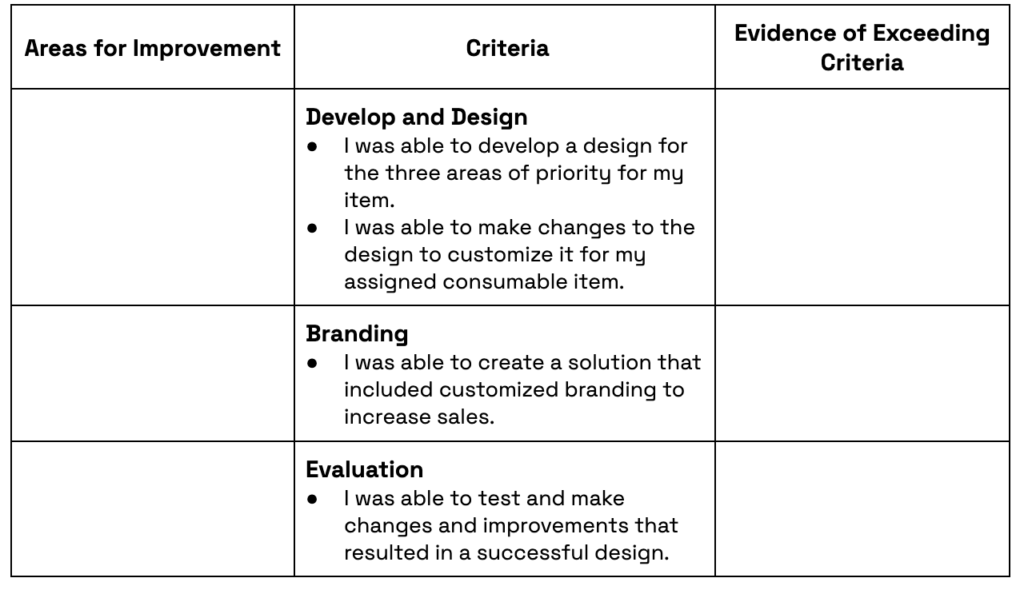
Lesson Instructions
Section 1 – Plan:
- Ask: “How can we organize the concession stand to better rotate stock, increase sales, and improve customer flow at the concession stand?” Give students time to think and time to share their ideas with others.
- Provide the sample designs for students to explore in small groups. Encourage students to notice how the design is constructed and how it works with the item it’s meant to hold.
- Tell students that their dispenser should help store items in an innovative way that maintains freshness and is easy to access. It should also help increase sales with an attractive display.
- Have students form teams of three or four. Provide each team with a consumable item that is stocked at the concession stand.
- Using this item as inspiration, students should brainstorm the best way to store this item for maximum freshness and easiest access. Give teams a piece of poster paper to collect their ideas. Using the Glowforge design as a reference, have teams create a drawing of their customized dispenser that includes measurements, branding, and material options for printing.
- Students should use rulers or tape measures to determine the specifications needed for their design. Students should make a note of the measurements on their design drawing as accurate measurements will be critical for creating their designs.
- Have students reflect on the three priority areas of redesign:
- Does our design ensure freshness with regular rotation?
- Does our design make the item easy to inventory while also creating easy access during the event?
- Is our design the best way to display the item for sale?
- Have students imagine how they can further customize their design with brandings such as school colors, a mascot or logo, or slogans. Students should include these customizations in their design drawings.
- Once the customized redesigned dispenser drawing is completed, allow time for students to present their ideas to the larger group.
- After each group shares, have students use the question stems below to offer peer feedback on how each group might innovate or improve a design.
- How would it be different if…?
- What would change if…?
- What other way could we…?
- Give students time to revise and incorporate peer feedback into their designs.
- Using a third-party design software such as Inkscape, students will create their customized design for their consumable item. Remind them that their measurements will be important here as they may have to adjust the design for their specific item. Encourage them to think about what parts and features they may need to adjust in their design.
- Have students provide a list of Proofgrade materials they would like to use for their finalized design.
Section 2 – Customize and Create:
Have students…
- Open the Glowforge app and upload the design files they created. Remember file type is important: use SVG or PDF for cutting and engraving, or JPG or PNG for engraving only.
- Students can then add their customizations to the design in the Glowforge app. To create brand customizations, students can use the Import tool in the Glowforge app to add logos, mascots, or labels to their designs. They can also use the Text tool or even pull in custom created designs using the Trace tool.
- Test print their customized designs to ensure that measurements are exact. If creating prototypes prior to final prints, consider using cardboard. Remember that if the design uses joinery such as slots or finger joints, these may need to be adjusted to suit the prototyping materials. When choosing test materials, make sure to use materials that are laser compatible. You can learn more about what materials are compatible with Glowforge here.
- Assemble and test the design for fit and functionality. Encourage students to iterate and revise their designs based on the test print. Students may find flaws in their designs during this process and can make notes and record changes to their design drawings as necessary.
- Pair students with a partner or small group for feedback sessions. Have teams meet for feedback sessions on each other’s designs. Discuss changes that could improve the custom design.
- Have students synthesize this feedback and make the needed changes to their designs in the Glowforge app.
- Print the finalized design in the appropriate material.
- Assemble their printed designs.

Section 3 – Use:
Ask students to…
- Fill their dispenser with a product to test ease of use.
- Deliver the organizational items to the concession stand or an event organizer.
- Gather data and feedback on their custom organizational solutions. Create a very simple feedback form that asks concession stand attendants about the utilization of the customized dispenser and what other items may need creative solutions. Consider using a digital form to collate the data and feedback.
Reflection Questions:
Help students consider…
- What parts of your custom design helped with maintaining freshness, increasing sales, and improving customer flow?
- How could these designs be utilized in a Family and Consumer Science class, Life Skills class, or MakerSpace to make organization easy and accessible?
- What feedback was most helpful? How will it influence your future designs?
Pro Tips:
- If creating prototypes prior to doing final prints, use cardboard for test prints. Just remember that if the design uses joinery such as slots or finger joints, these may need to be adjusted to suit the prototyping materials.
- Consider printing all designs in the same materials to create consistency in the displays. Acrylics offer aesthetically pleasing colors and draftboard can be easily customized using paint. Make sure students are aware of the Proofgrade materials available to them and that you will have enough of each color in advance of beginning the activity. When choosing materials, make sure to use materials that are laser compatible. You can learn more about what materials are compatible with Glowforge here.
- Consider other designs available in the Glowforge Design Catalog that can be used to organize spaces.
Reimagine:
- How might these designs be used in the classroom to organize materials and tools? Interview educators for their organizational needs and use these designs to create solutions for their specific spaces. For example, Life Skills classes or Family and Consumer Science classes could use these designs to organize a classroom kitchen or pantry space.
- How might these prints be customized and marketed to the community? Students can create customized solutions for individuals and use the profits from the sales to support a local food pantry or other charity organization.
Remix:
- Create a design challenge. For example, how could you redesign the Granola Dispenser to self feed the next bar using a slanted bottom? Could you turn it into a pen dispenser by making the opening smaller and adding a stopper? What needs to change in the design, or what needs to be added? How can students improve on the design or recreate it for another purpose?
- Reach out to local food pantries and have students create organizational solutions to help them organize and rotate stock efficiently. Customize the designs to help volunteers find and store food items more quickly!
Meet Glowforge
The magical 3D laser printer that made this lesson possible. Learn more!
