Grade Level
2, 3, 4, 5, and 6
Difficulty
Easy
Duration
45 minutes
Subjects
Mathematics
Physics
Science
STEAM
Summer Camp
Vocab
concave mirror – A mirror that curves inwards, like the inside of a bowl.
convex mirror – A mirror that curves outwards, like the top of a dome.
focal point (or focus) – The point from a spherical mirror or thin lens where parallel rays of light converge.
real image
Author
Glowforge
Licensing

Lesson for Download
Overview
In this lesson, students will:
- STEP 2 – Complete Mirror Reflecting Light Lesson FIRST
- Laser cut a special guide to determine the relative orientation of two mirrors
- Using the guide, observe the reflection of an object placed between two mirrors oriented at different angles to each other
- Design and create a course to make light reflect off mirrors to hit a target.
Objective
Using angle measurements, students will be able to observe the relationship between the relative orientation of two mirrors and the number of reflections which appear int he mirrors. Applying the rules that govern the reflection of light, students will be able to set up a sequence of mirrors to guide a light beam through a complex path to reach a target.
Supplies
MATERIALS & TOOLS:
- Free standing mirrors from the “Mirror Reflecting Light” lesson plan
- Flat wooden sheet or other flat material that may be etched and cut with a laser cutter
- Flashlight
- Paper/pencil
- Ruler and protractor to draw straight lines and measure angles
Design Files

Description
Lesson Outline:
In the previous lesson, “Reflections on Mirrors” students qualitatively observed the path light travels when reflecting from a mirror. They observed that light reflecting off a mirror leaves at the same angle at which it strikes the mirror. This is illustrated in the diagram below. 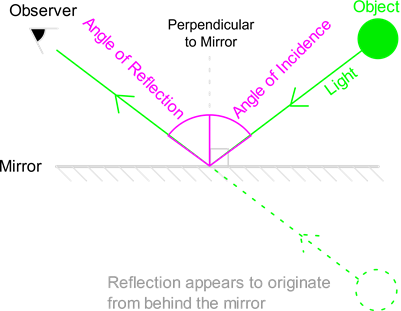 When light bounces off more than one mirror it creates some interesting visual effects. For example, aligning two adjacent mirrors at an angle generates multiple reflections of a single object, and changing that angle changes the number of times the reflection is repeated. Using what we know about light reflection, we can also design a “course” with mirrors to make light travel from a source and hit a target.
Lesson Instructions
Step 1: SETUP
Two or more free-standing mirrors from the “Reflections on Mirrors” lesson will be required. See that lesson for instructions to create the mirrors if necessary.

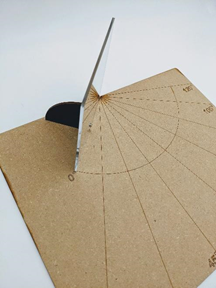
To measure the relative alignment of the mirrors, this lesson uses a laser-cut base (pattern shown above) which is etched with angle measurements. Using the vector file “AngleMeasurementBase.svg” cut a base from flat wood, cardboard, acrylic or any other flat sheet material which is safe to laser cut and etch. In the vector file, the black lines in the file are for cutting and the red lines are for etching.
Step 2: Explorations: Angles and Reflections

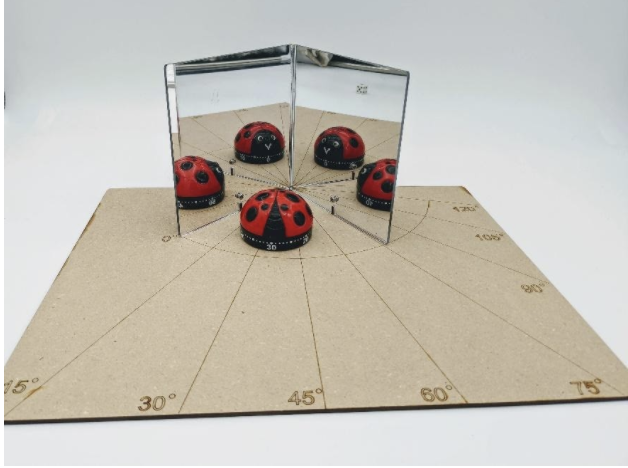
Place the angle measurement base on a flat surface. Set one mirror on the base so that it fits inside the outline labelled 0 degrees. Place a second mirror so that one of its edges sits next to the first mirror and position the second mirror so that its bottom edge lies along one of the angled lines. Place an object halfway between the two mirrors. Multiple copies of the object will be visible in the mirror. Ask the students to count the number of reflections they can see.
Ask the students to change the angle of the mirror and note how the mirror angle relates to the number of visible reflections of the object.
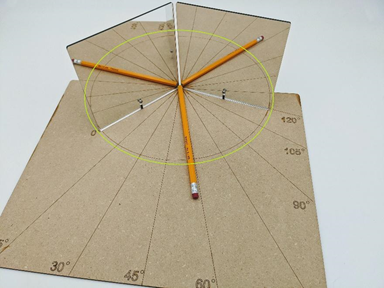
Students should note that as the angle between mirrors decreases the number of reflections increases and vice versa. To better understand the relationship between the two, have students observe the circle formed by the curved line that lies between the mirrors and its reflection (outlined in green in the picture above). Ask the students to observe that the curved line plus the reflection forms a complete circle no matter the angle between mirrors.
The relationship between mirror angle and number of copies of the object can be visualized by noting that the curve between mirrors combined with its reflection always forms a 360-degree circle. This means that whatever lies in the space between the angled mirrors is reflected exactly enough times to complete a 360-degree circle. Therefore, if the angle between mirrors is 90 degrees, there will be 360/90 = 4 images of the object visible (the object itself plus 3 reflections). Ask students to verify this relationship with a chart like the one below:
|
Mirror Angle (degrees) |
360/Mirror Angle |
Number of Copies of the Object (number of reflections + 1 for the object) |
|
90 |
4 |
3 + 1 = 4 |
|
|
|
|
|
|
|
|
Step 3: Ray Tracing

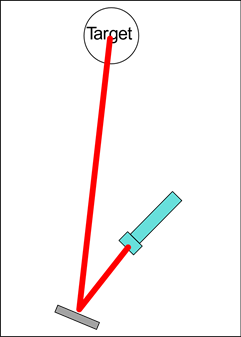
Ask the students to draw a “map” illustrating the positions of the flashlight, target and mirror from the top view on a piece of paper. Using a ruler and a pencil, trace the path of the light as it travels from the flashlight to the target. If students are comfortable using a protractor, ask them to measure the angle of the light as it enters and leaves the mirror. How do the angles compare?
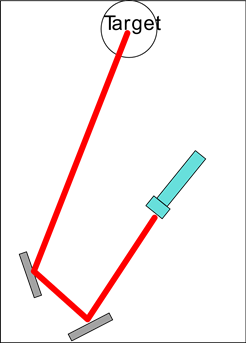
If students succeed with one mirror, make the task more challenging by asking them to repeat it using two, three or more mirrors. Additional challenges can be added by placing obstacles on the table that the light beam must avoid.
Step 4: Assessment/Evaluation
Discuss with students whether their observations in this lesson confirmed what they know about light reflection. Ask them to think of real world examples where mirrors are used to view objects that are hard to see directly (e.g. rear-view mirrors on cars, mirrors at parking garage exits to show pedestrians, dentist tools to view the inside of one’s mouth). Discuss how the orientation of the mirrors in those examples is determined by the position of the viewer and the object which they are trying to see.
Meet Glowforge
The magical 3D laser printer that made this lesson possible. Learn more!
