Grade Level
3, 4, 5, 6, 7, 8, 9, 10, 11, and 12
Difficulty
Easy
Duration
30 minutes
Subjects
Art
Design & technology
Digital Arts
English
Gift Ideas
Holiday
Home Economics
Student Gifts
Teacher Gifts
-
Students communicate clearly and express themselves creatively for a variety of purposes using the platforms, tools, styles, formats and digital media appropriate to their goals.
-
Students use digital tools to broaden their perspectives and enrich their learning by collaborating with others and working effectively in teams locally and globally.
Vocab
Identity Badge
Adjectives
Core Values
Author
Glowforge
Licensing
Overview
Let’s get to know each other. Fostering opportunities for students to create deeper connections and trust in the classroom creates positive learning opportunities for all. In this activity, students create a classroom badge with adjectives and graphics to represent who they are. The identity badges are used to help facilitate conversations that help students make connections with their peers.
Objective
Students will…Thematic Questions:
Outcomes:
Standards:
ISTE Standards for Students
Supplies
For each badge you will need:
- 1x Medium Draftboard
- Optional: any Medium thickness material. This is a great projects for scrap materials.
- Chart paper
Sticky notes - Optional: Markers or paint
Catalog Designs
For this activity, you will use the shapes, graphics, and text tools inside the Glowforge app to create your design.
Description
Lesson Outline:
Get Ready:
- Read through the activity details to review the steps for completing the activity.
- Gather all of the materials needed to print the designs.
- Familiarize yourself with the Glowforge app tools. Read the Glowforge support article “Make a Gift Tag from Scratch using Premium Creative Tools” to learn more.
- Consider printing your own Identity Badge as an example to help students visualize the size and layout of the design, and to help your students get to know you!
- Explore the reference materials for the activity.
- Draw a simple outline of a person on a piece of chart paper. Post it in the front of the room.
Production Time:
Print – time will vary depending on unique designs
Assemble – 0 minutes
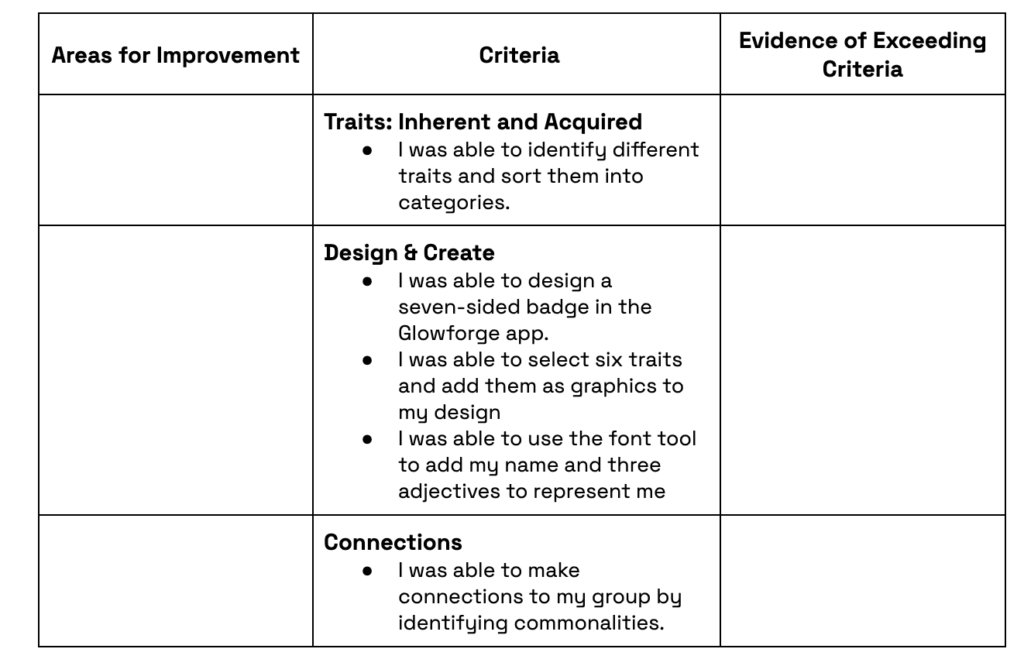
Rubric:
Use this optional rubric for student self-reflection or formative feedback throughout the Making Connections experience.
Lesson Instructions
Section 1 – Plan:
- Ask: “What makes you who you are?” and “What are the traits that make someone identifiable?” To spark students’ ideas, introduce yourself using your own Identity Badge.
- Help students notice that some traits are inherited – you are born with them, and some are acquired or learned – you develop them over time and they may change.
- Examples of inherited traits might include: height, gender, eye color, athleticism
- Examples of acquired or learned traits might include: preferences for a particular sport, a favorite food, a most-loved music genre
- Have students brainstorm other examples of traits, preferences, interests, and beliefs that form a person’s identity. Write each trait on a sticky note and post it on the outline of a person. Have students put inherited traits inside the outline and acquired traits outside the outline.
- Use the list of traits identified to help students think about aspects of their identity they would like to share with others. Students should keep a list of their own defining traits on a piece of paper.
- Have students individually write an autobiographical poem about themselves that references the traits they’ve defined. Autobiographical poems usually include experiences, relationships, likes, and interests. Facing History and Ourselves offers a good template to follow.
- Pair students up to share their poems. After each student has read, have them share one thing they found most interesting or surprising from each others’ poems. Then, in their pairs, have students consider what symbols they could use to represent some of their likes, accomplishments, hopes.
- As they discuss, have each student decide on six icons to represent them and draw them next to what they wrote in their poem.

Section 2 – Customize and Create:
Have students…
- Open the Glowforge app. Click the Create button in the top left of the Glowforge Dashboard.
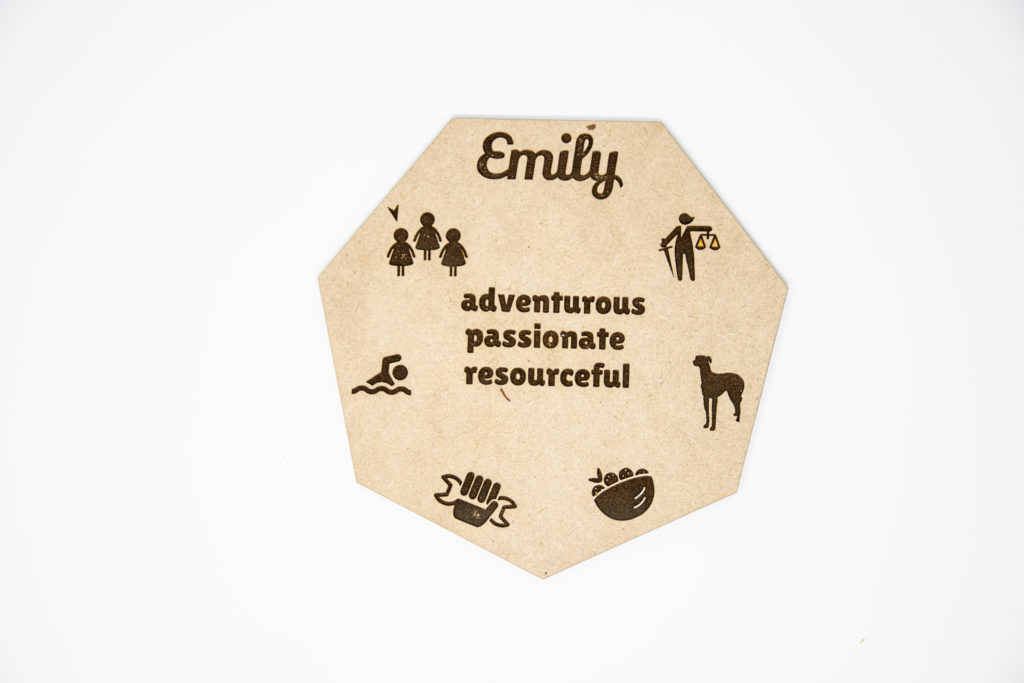
- Click the Insert Shape tool. Select Polygon. Set it to 7 points and 0 in on the Round Corners. These settings will make a shape similar to a badge.
- Set the size of the badge by selecting the shape and then clicking the ruler in the bottom left. A width of 5.5” x 5.362’ is a good size to work with, but the design can be sized up or down as needed.
- Refer to their autobiographical poem and add:
- Six graphics placed near the center of each side of the badge;
- Their name is at the top of the badge; and,
- Three adjectives to describe themselves in the center.
- Resize the graphics and fonts to fit nicely on the badge. They can also choose from a variety of fonts.
- Print out their finalized design on their chosen material. Customize the badge with paint or markers.
Section 3 – Use:
- Have students work in small groups of 3-4. Choose groups randomly or consider placing all the badges in a box or bag and pulling out 3-4 at a time to create groups.
- In their groups, have students discuss and write a definition for the word “community”. Ask groups to share their definitions with the class.
- Show students the Merriam-Webster Dictionary of definition of community. Ask students if they are missing anything from their definition. Give students time to think and time to share their ideas with each other.
- Based on their definitions, ask: “Is our class a community?” Encourage students to identify aspects of the class that make it feel like a community.
- Have students work in their groups to discuss the following questions.
- What do you like about our class community?
- How could we improve our class community?
- What do we value in our class community?
Encourage them to give each group member a chance to share their ideas. Consider setting a timer for a short amount of time for each question to keep the conversation moving.
- Remind students that the class community is composed of individuals. Tell students that they will work in their groups to explore what makes each person unique and what they all have in common.
- Have students place their badges in the center of the group. Ask: “What similarities do you notice on the badges?” and “What things on the badges are interesting or surprising?” Consider setting a timer to help students stay focused.
- After students discuss, have them decide on one icon that could represent their group based on their similarities.
- Have groups share their icon and explain the significance of the icon to their class.
- Close the activity with a 60-second strategy like Appreciation, Apology, Aha!. Consider modeling this strategy yourself before having students begin.
- Appreciation: Acknowledge someone who helped or shared!
- Apology: Acknowledge some preconceived notion you held and how this has changed.
- A-ha!: Acknowledge an experience or understanding they uncovered about themselves, a classmate, or the world!
Reflection Questions:
Help students consider…
- What interesting discoveries did you make while working on this project? What is something you thought you knew but discovered more about through this project?
- What did you learn about creating a design with the Glowforge app? What might you do differently next time?
- What qualities of a strong community does our class already have? What do we need to work on to be stronger?
Pro Tips:
- Consider using magnets to put the badges on the whiteboard or push pins for a bulletin board. Use the badge to organize students into groups for different activities throughout the year.
- Have students select a partner from the badges until they have worked with a different person for each activity throughout the semester. Try to start off with a two-minute icebreaker question each time to encourage and strengthen the community.
- Sizing down can make text hard to read but it allows you to fit more badges on one piece of material. Try various sized badges to accommodate different needs in your classroom.
Reimagine:
- How could we add complexity to our custom games? Use this badge to create additional customized components for the Custom Games activity. Could the badge be used for tokens, game pieces, chits, cards, or other commodities?
- What other materials could you print your badge on? Create the badge on acrylic and use a dry erase marker to write on the badge for different purposes. When choosing test materials, make sure to use materials that are laser compatible. You can learn more about what materials are compatible with Glowforge here.
Remix:
- Connect this activity to ancient civilizations. There were strong connections to tribes, republics, and federations among these communities built on commonalities like bloodlines, religion, location, traditions, and beliefs. Create identity shapes for emerging civilizations and what qualities and commonalities they revered. Have students compare civilizations.
- Use the badges to select students for various classroom jobs, random participation, or making groups. Place badges in a bag and have students draw badges for partners or groups.
Meet Glowforge
The magical 3D laser printer that made this lesson possible. Learn more!
