Grade Level
4, 5, 6, and 7
Difficulty
Easy
Duration
1 hour 30 minutes
Subjects
Vocab
Author
Licensing
Lesson for Download
Overview
In this lesson, students will:
- Laser cut the materials for the periscope mirrors and body
- Observe the properties of reflections in mirrored acrylic
- Assemble the periscope
- Test the periscope
Objective
Assemble a periscope and use it to observe light reflection
Supplies
MATERIALS & TOOLS:
- 1/8” (3.2mm) wood sheet (the wood must be exactly 1/8” or the pieces will not fit together well)
- 1/8” mirrored acrylic
- (14) 14mm long M3 Screws and nuts (1/2” long 4-48 screws /nuts will work as well)
- Screwdriver
- Laser Cutter
Design Files


Description
Lesson Outline:
Light tries to travel in a straight line. We see an object when the light from it reaches our eyes. If there is an obstacle between us and the object we want to see, the light from the object will be blocked: 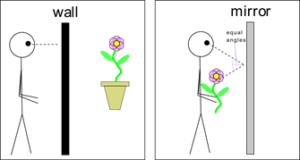 Sometimes, when light hits a surface, like a wall, the light is absorbed and stops travelling. In certain cases, if the surface is reflective the light will bounce off the surface, and travel in a different direction. We can see ourselves reflected in mirrors because the light travels from our bodies to the mirror, then bounces back to our eyes. We know that light always bounces off a flat surface in such a way that the angle it makes coming into the surface is the same as the angle it makes moving away from the surface. In this lesson, we will use the reflective properties of mirrored acrylic to construct a periscope – a device which holds two mirrors parallel to each other and allows us to see things that are not in our direct line of sight.
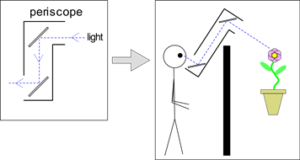
Lesson Instructions
Step 1: Laser Cut the Parts
Description 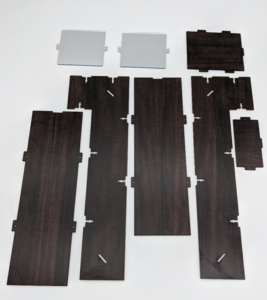 Cut the reflectors from the mirrored acrylic using the vector file “PeriscopeMirrors.svg”. Using a laser cutter with a mirror can be dangerous if the laser reflects off of the mirrored surface, so be sure that the mirrored surface of the acrylic is facing downwards when being cut, or that it is covered with protective paper. Once the mirrored acrylic is cut, peel off any protective paper. Take a moment to observe the way light reflects off the mirror. Using one of the mirrors you have cut, look behind you and notice how your view changes when you angle the mirror in different directions. Cut the pieces for the periscope body from 1/8” (3.2mm) thick wooden sheet, using the vector file “PeriscopeBody.svg” . The hammer-shaped pieces are the sides of the periscope and the long straight wood pieces comprise the front and the back sides of the periscope.
 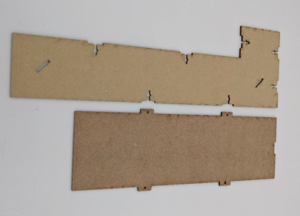 Place the back of the periscope perpendicular to the side so that the tabs from the back piece fit into the slots in the side piece as shown. The back piece contains a notch which should align with the hammer-shaped end of the side piece as shown in the pictures.
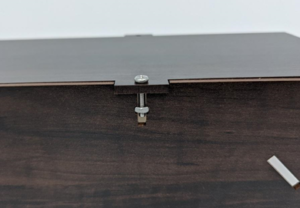 Slide an M3 nut into the cross portion of one of the small “t” shaped notches in the side, and insert a 14mm M3 screw through the hole in the tab until it reaches the nut. Twist the screw with your fingers until it engages with the nut, then continue to tighten it with a screwdriver until it secures the two wood pieces together. Do the same for the other matching slot and tab in the two pieces.
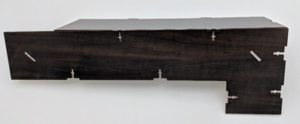
  We’ll prepare to attach the other side piece of the periscope, but before securing it with screws and nuts, place the two pieces of mirrored acrylic between the angled slots in the periscope sides. Be sure that the reflective sides of the acrylic face towards each other as shown in the picture.
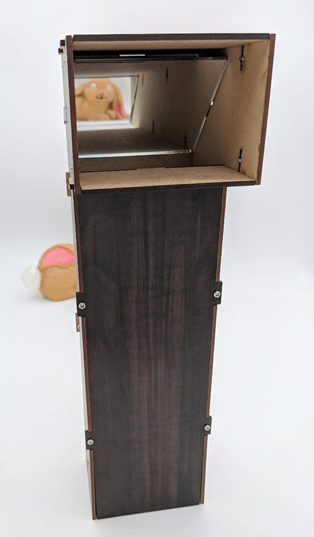
 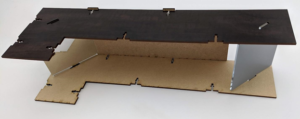 Attach the second side of the periscope so that the acrylic mirrors are held in place between the two sides and the tabs from the back of the periscope fit into the slots in the side of the periscope. As before, insert screws and nuts to secure the tabs to the slots.
 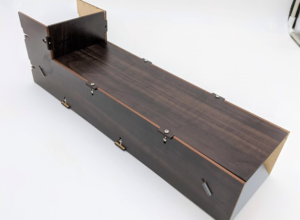 Now attach the long piece that forms the front of the periscope. Be sure the notch in the front piece is at the top – nearest the hammer-shaped portion of the periscope. Secure it in place with screws and nuts as shown above, then take the smallest wooden piece and attach it below the hammer shaped portion of the periscope, just at the top of the front piece as shown. The tab on the small wooden piece slides into the notch in the front piece of the periscope. Secure the front piece and small with screws and nuts.
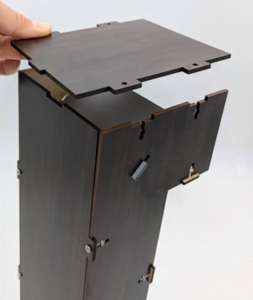
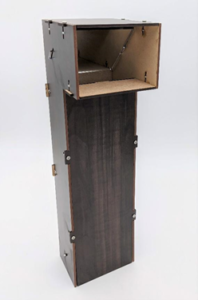 Place the remaining wooden piece at the top of the periscope. The tab of the topmost piece slots into the notch at the back of the periscope as shown. Fasten the top to the sides with screws and nuts. If the mirrors are aligned correctly, you will be able to look through one opening of the periscope and see out the other opening.
Step 2: Evaluate and Test
- Try out your new periscope. Look through the gap in the back and notice what you see. Are the objects you can see directly in front of you, or are they somewhere else?
- Look at someone else’s face through the periscope. Can they see you? Why might that be?
- Use the periscope to look around walls and over obstacles.
Step 3: Thought Topics for Further Exploration
- How could you modify the design of this periscope to see over a wall that is 3 feet taller than you?
- What would happen if the mirrors in the periscope weren’t parallel to each other? Would the periscope still work?
- Could the design of this periscope be changed so that instead of seeing objects in front of you, you see objects behind you?
Meet Glowforge
The magical 3D laser printer that made this lesson possible. Learn more!
